Building a Serverless Comment System with Netlify Functions, Storyblok and Vue.js
- #javascript ,
- #vue ,
- #headless-cms ,
- #serverless ,
- #netlify
For a long time, I was able to abstain, but now the time has come: I’m jumping on the Serverless hype train. Today we build a Serverless comment system powered by Netlify Functions, and we use the headless CMS Storyblok as a database (on steroids) to store the comments entered by our users. Furthermore, we use Vue.js to build the frontend of our application. Because we want to make sure that only humans are allowed to add new comments, we use the latest reCAPTCHA v3 beta to get a score of the likelihood that a comment was entered not by a human but a bot. If the author of the comment is likely to be a robot, we not save the comment in Storyblok.
If you’re curious about the result, you can check out the complete code on GitHub or take a look at the application hosted on Netlify.
Storyblok
Storyblok is a powerful headless CMS which plays very well with the Vue.js frontend stack. I’ll not go into much detail on how to use Storyblok with Vue.js but you can read some of my recent articles about building websites with Storyblok and Vue.js or how to use Vue.js plugins to create custom field types in Storyblok if you’re interested in this topic.
Components
Let’s get started by creating two new components in Storyblok. First we need a component for the data structure of the comments we want to store in Storyblok.
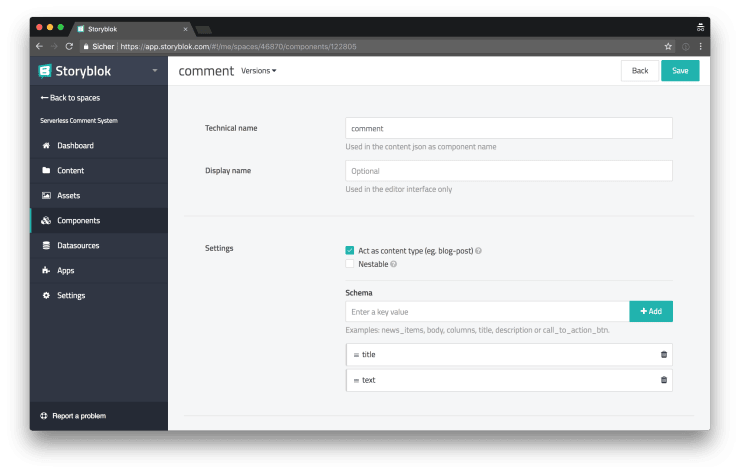
The comment component you can see above, has only two fields: a title field and a plain text field.
Next we have to create a second content type to store the actual content to which our users can add comments later.
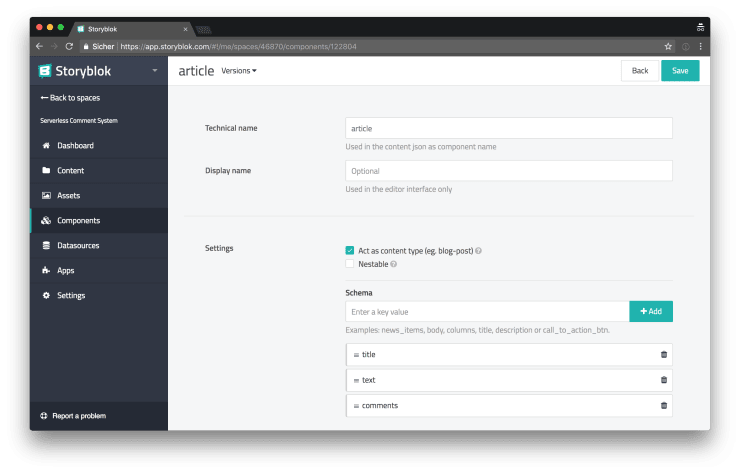
Adding a new article component
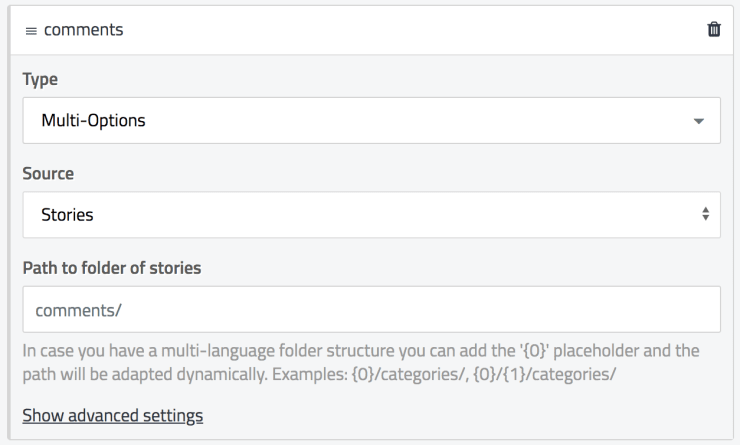
The article component also has a title and a text field but additionally we’ve also added a field for referencing comments. In the following screenshot you can see the settings of the comments field.
Content
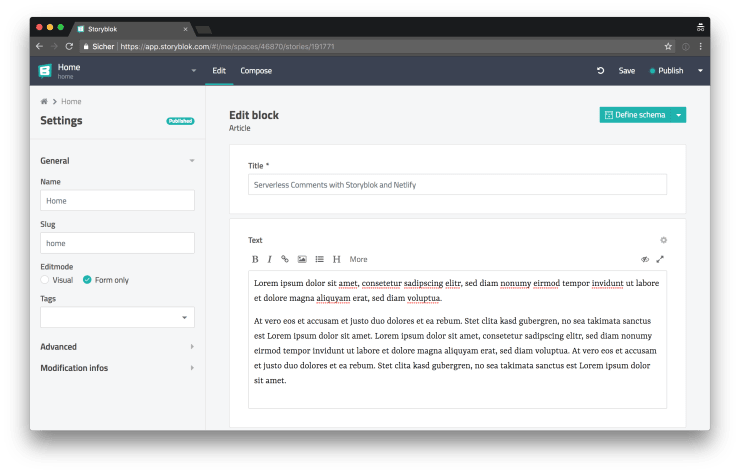
Now we’re ready to add new content to our Storyblok space. For our little demo application, we need only one content for the homepage, so we add a new story of type article.
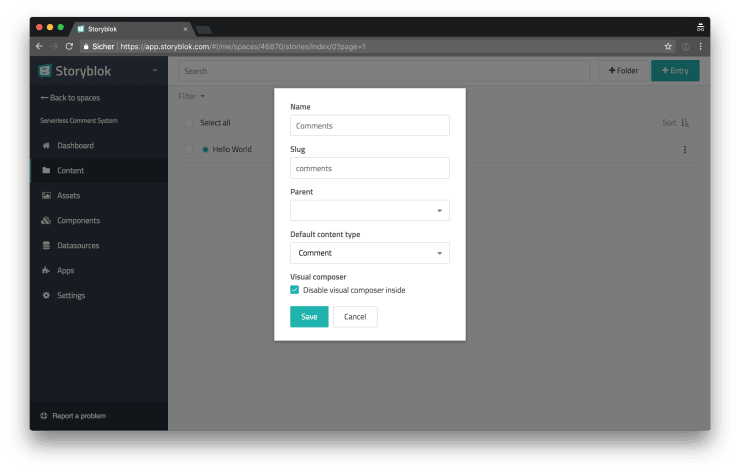
Depending on how popular our application we’ll be, at some point in the future, there might be hundreds or maybe even thousands of comments. Luckily Storyblok makes it possible to create folders to help us keep order.
Project setup
After configuring Storyblok to our needs, we can get started with building our application. In the following steps I assume, that you have a Vue CLI powered Vue.js application up and running. You can read the official documentation to learn more about how to set up a Vue.js project with the Vue CLI.
Configuring Netlify
In order to get started with building Lambda Functions with Netlify, we have to add a netlify.toml configuration file to the root directory of our application.
[build]
  # This will be your default build command.
  command = "npm run build"
  # This is where Netlify will look for your lambda functions.
  functions = "functions"
  # This is the directory that you are publishing from.
  publish = "dist"
Because we’ll use a build step to create our Lambda Functions, we don’t want to commit our functions directory to Git. Let’s add it to our .gitignore file, to prevent this.
 # Folders to ignore
+/functions
 dist
 node_modules
Netlify provides us with a tool for running Lambda Functions locally: netlify-lambda.
npm install netlify-lambda --saveAfter installing netlify-lambda we can run netlify-lambda serve src-functions in a npm script to serve functions located in the src-functions directory locally under http://localhost:9000. This is fine for testing the Lambda Functions standalone but we want to access the endpoints provided by our Lambda Functions, from our Vue.js application. To make this possible, we can configure webpack to proxy localhost:9000 and make our endpoints available under the URL of our webpack dev server (e.g. http://localhost:8080/.netlify/functions/FUNCTION_NAME) similar to how the functions are served on Netlify (e.g. https://yourdomain.com/.netlify/functions/FUNCTION_NAME).
Luckily, the default Vue CLI setup already includes all the tools necessary for proxying requests. In order to do so, we have to update our vue.config.js file.
 module.exports = {
+  devServer: {
+    proxy: {
+      '/.netlify': {
+        target: 'http://localhost:9000',
+        pathRewrite: { '^/.netlify/functions': '' },
+      },
+    },
+  },
   lintOnSave: false,
 };
To make it easier to start the development server and to build everything we need for production, we can update our serve and build scripts in the package.json file.
     "version": "0.1.0",
     "private": true,
     "scripts": {
-    "serve": "vue-cli-service serve",
+    "serve": "netlify-lambda serve src-functions & vue-cli-service serve",
-    "build": "vue-cli-service build",
+    "build": "netlify-lambda build src-functions && vue-cli-service build",
     "lint:scripts": "eslint --ext .js,.vue --ignore-path .gitignore .",
     "lint:styles": "stylelint 'src/**/*.+(scss|vue)'",
     "lint": "yarn run lint:scripts && yarn run lint:styles"
Netlify Functions and the Storyblok API
The reason why we’ve set up Netlify Functions to work with our application is, that we want to use a Serverless Function to communicate with the Storyblok API. Let’s build a Serverless Function which is able to create new content in Storyblok.
Creating the Serverless Function
npm install axios slug --saveAfter installing the dependencies we need to build our Serverless Function, we can start getting our hands dirty.
// src-functions/add-comment.js
const axios = require("axios");
const slug = require("slug");

// You have to generate an API token in the
// Storyblok user interface and add it to your
// environment variables both locally and in
// your Netlify deployment settings.
const { API_TOKEN } = process.env;
const API_URL = `https://api.storyblok.com/v1/spaces`;
// You can find the folder id and the space id
// by navigating to the `Comments` folder in
// Storyblok and looking at the URL:
// e.g. https://app.storyblok.com/#!/me/spaces/46870/stories/index/191712
const COMMENT_FOLDER_ID = 191712;
const SPACE_ID = 46870;

// We create a new axios instance, pre-configured
// to handle Storyblok API requests.
const storyblok = axios.create({
  baseURL: API_URL,
  headers: {
    Authorization: API_TOKEN,
  },
});

function saveComment({ text, title }) {
  const timestamp = Math.round(Date.now() / 1000);

  return storyblok.post(`${SPACE_ID}/stories`, {
    // If you want to approve comments before
    // publishing, you can change this to `0`,
    publish: 1,
    story: {
      content: {
        component: "comment",
        text,
        title,
      },
      name: title,
      parent_id: COMMENT_FOLDER_ID,
      // We use the current timestamp and the
      // given title to create a unique slug.
      slug: slug(`${title} ${timestamp}`),
    },
  });
}

exports.handler = async (event, context, callback) => {
  try {
    // Do not handle requests if the request
    // type is something other than `POST` or
    // if the request body is empty.
    if (event.httpMethod !== "POST" || !event.body) {
      callback(null, {
        statusCode: 400,
        body: JSON.stringify({ status: "Bad Request" }),
      });
      return;
    }

    const { text, title } = JSON.parse(event.body);

    // Do not handle requests with missing data.
    if (!text || !title) {
      callback(null, {
        statusCode: 422,
        body: JSON.stringify({ status: "Unprocessable Entity" }),
      });
      return;
    }

    await saveComment({ text, title });

    callback(null, {
      statusCode: 200,
      body: JSON.stringify({ status: "success" }),
    });
  } catch (error) {
    callback(null, {
      statusCode: 500,
      body: JSON.stringify({ status: "error" }),
    });
  }
};
Above you can see the code necessary for adding new comments via the Storyblok API. You might notice, that we do not reference the comment in any way with an existing article, we’ll come back later to add this functionality.
Creating the article page
Next we need a form for sending data to our newly created Serverless Function endpoint. We’ll build a simple Vue.js application for this purpose.
npm install marked storyblok-js-client --saveWe need the marked package for converting Markdown into HTML and we’ll use the storyblok-js-client to query the Storyblok API.
<template>
  <div id="app" class="App o-container">
    <template v-if="story">
      <div class="App__article">
        <h1>{{ story.content.title }}</h1>
        <div class="o-content" v-html="md(story.content.text)" />
      </div>

      <div class="App__comments">
        <h2>Comments</h2>

        <form class="App__commentForm" @submit.prevent="addComment">
          <div>
            <label for="title">Title</label>
            <input id="title" v-model="title" />
          </div>

          <div>
            <label for="text">Text</label>
            <textarea id="text" v-model="text" rows="5" />
          </div>
          <button>Add comment</button>
        </form>

        <div class="App__commentListing">
          <div
            v-for="comment in comments"
            :key="comment.uuid"
            class="App__comment"
          >
            <h3>{{ comment.content.title }}</h3>
            <p>{{ comment.content.text }}</p>
          </div>
        </div>
      </div>
    </template>
  </div>
</template>

<script>
import axios from "axios";
import marked from "marked";

import api from "./utils/api";

export default {
  name: "App",
  data() {
    return {
      newComments: [],
      story: null,
      text: "",
      title: "",
    };
  },
  computed: {
    comments() {
      if (!this.story) return this.newComments;

      // Merge the comments from the API
      // response with the newly created
      // comments and sort them by
      // creation date.
      return [...this.story.content.comments, ...this.newComments].sort(
        (a, b) => a.created_at < b.created_at,
      );
    },
  },
  created() {
    this.loadStory();
    this.md = marked;
  },
  methods: {
    async addComment() {
      const { text, title } = this;

      this.text = "";
      this.title = "";

      // Add the comment immediately and hope
      // that the request succeeds. This is
      // called "optimistic UI".
      this.newComments.push({
        content: {
          text,
          title,
        },
        created_at: new Date().toISOString(),
        uuid: Date.now(),
      });

      // Send the data to the endpoint
      // provided by our Serverless Function.
      await axios.post(".netlify/functions/add-comment", {
        text,
        title,
      });
    },
    async loadStory() {
      // Load the story with the slug `home`
      // and all comments related to the story.
      const response = await api.get("cdn/stories/home", {
        resolve_relations: "comments",
      });
      this.story = response.data.story;
    },
  },
};
</script>
In the code block above, you can see a Vue.js component which renders a simple form with a title and a text field. When the form is submitted, the addComment() method is triggered and the data is sent to the endpoint provided by our Serverless Function. You can find the code of the api utility, which we use to fetch data from Storyblok, in the GitHub repository.
Additionally, we also render the content of the article, we’ve created earlier in Storyblok, and we also render a list of comments beneath the comment form.
Referencing comments with articles
We’re already able to create new comments via our simple Vue.js powered form. But for now, those comments are not linked to any article yet. Let’s update our code to change that.
       // Send the data to the endpoint
       // provided by our Serverless Function.
       await axios.post('.netlify/functions/add-comment', {
+        articleId: this.story.id,
         text,
         title,
       });
In the App.vue component we only have to add one new line in order to send the articleId to the add-comment endpoint. Let’s also update the add-comment.js function to make use of the newly provided articleId.
       slug: slug(`${title} ${timestamp}`),
     },
   });
 }

+function loadArticle(id) {
+  return storyblok.get(`${SPACE_ID}/stories/${id}`);
+}
+
+function addCommentToArticle({ article, comment }) {
+  const { story } = article.data;
+  story.content.comments.push(comment.data.story.uuid);
+
+  return storyblok.put(`${SPACE_ID}/stories/${story.id}`, {
+    publish: 1,
+    story,
+  });
+}
+
 exports.handler = async (event, context, callback) => {
   try {
     // Do not handle requests if the request
     // type is something other than `POST` or
     // if the request body is empty.
     if (event.httpMethod !== 'POST' || !event.body) {
       callback(null, {
         statusCode: 400,
         body: JSON.stringify({ status: 'Bad Request' }),
       });
       return;
     }

     const {
+      articleId,
       text,
       title,
     } = JSON.parse(event.body);

     // Do not handle requests with missing data.
-    if (!text || !title) {
+    if (!articleId || !text || !title) {
       callback(null, {
         statusCode: 422,
         body: JSON.stringify({ status: 'Unprocessable Entity' }),
       });
       return;
     }

-    await saveComment({ text, title });
+    const articlePromise = loadArticle(articleId);
+    const commentPromise = saveComment({ text, title });
+
+    const article = await articlePromise;
+    const comment = await commentPromise;
+
+    await addCommentToArticle({ article, comment });

     callback(null, {
       statusCode: 200,
Above you can see the updated add-comment.js Serverless Function file. We’ve added two new functions: the loadArticle() and the addCommentToArticle() function. The loadArticle() function is used to load the article with the ID which is now provided to the Serverless Function endpoint. In the addCommentToArticle() we add the UUID of the new comment to the list of comments which are already linked to the article. Afterwards the updated article is sent back to the Storyblok API.
Securing the form with reCAPTCHA v3
Now our comment system does already work the way we expect it to work. Their is still one problem remaining, though: it’d be very easy for bots to abuse our contact form. Their are two ways around this, either we do not publish new comments automatically, but approve them manually or we can prevent bots from creating new comments by using something like reCAPTCHA. Let’s take a look at how we can solve this.
First of all you have to register for reCAPTCHA v3 beta. Afterwards you get two keys: one public key which you must use as a parameter for loading the reCAPTCHA script (as you can see below) and a private one which we gonna use in the Serverless Function.
     <link rel="icon" href="<%= BASE_URL %>favicon.ico">
     <title>Building a Serverless Comment System with Netlify Functions, Storyblok and Vue.js</title>
+    <script src="https://www.google.com/recaptcha/api.js?render=6LdsOmgUAAAAAHCH1GM7fH9WZwvLAHc6PDHjBBxd"></script>
   </head>
   <body>
First we have to add the reCAPTCHA script to our public/index.html file, as you can see above. Next we update our App.vue component to also send a reCAPTCHA token to our add-comment endpoint.
         uuid: Date.now(),
       });

+      const recaptchaToken = await this.recaptchaToken();
       // Send the data to the endpoint
       // provided by our Serverless Function.
       await axios.post('.netlify/functions/add-comment', {
         articleId: this.story.id,
+        recaptchaToken,
         text,
         title,
       });
     },
     async loadStory() {
       // Load the story with the slug `home`
       // and all comments related to the story.
       const response = await api.get('cdn/stories/home', { resolve_relations: 'comments' });
       this.story = response.data.story;
     },
+    recaptchaToken() {
+      return new Promise((resolve) => {
+        grecaptcha.ready(async () => {
+          const token = await grecaptcha.execute('6LdsOmgUAAAAAHCH1GM7fH9WZwvLAHc6PDHjBBxd', { action: 'comment' });
+          resolve(token);
+        });
+      });
+    },
   },
 };
 </script>
The token used as the first parameter of the grecaptcha.execute() command, is the public token you’ve received earlier.
Now everything is set up to send the token to our add-comment.js Serverless Function in order to verify it.
// ...
const { RECAPTCHA_SECRET } = process.env;
const RECAPTCHA_VERIFY_URL = "https://www.google.com/recaptcha/api/siteverify";

// ...

function isHuman(recaptchaToken) {
  return axios
    .post(
      `${RECAPTCHA_VERIFY_URL}?response=${recaptchaToken}&secret=${RECAPTCHA_SECRET}`,
    )
    .then(({ data }) => data.score > 0.5);
}
At the beginning of the add-comment.js file, we add two new constants: RECAPTCHA_SECRET which should not be tracked in your version control system, that’s why we retrieve it from the environment variables, and the RECAPTCHA_VERIFY_URL provided by the Google reCAPTCHA service.
Furthermore we add a new isHuman() function, which takes the recaptchaToken we get from the frontend and sends it to the reCAPTCHA API in order to get back a score between 0 and 1. A score of 0 means that the input was almost certainly made by a robot, while 1 is almost certainly a human. In our case we declare everything above 0.5 a human, you might tweak this number to prevent false positives or negatives.
     const {
       articleId,
+      recaptchaToken,
       text,
       title,
     } = JSON.parse(event.body);

     // Do not handle requests with missing data.
-    if (!articleId || !text || !title) {
+    if (!articleId || !recaptchaToken || !text || !title) {
       callback(null, {
         statusCode: 422,
         body: JSON.stringify({ status: 'Unprocessable Entity' }),
       });
       return;
     }

+    if (await isHuman(recaptchaToken)) {
       const articlePromise = loadArticle(articleId);
       const commentPromise = saveComment({ text, title });

       const article = await articlePromise;
       const comment = await commentPromise;

       await addCommentToArticle({ article, comment });
+    }

     callback(null, {
       statusCode: 200,
After applying the changes you can see in the diff above, our comment system is now secured by reCAPTCHA to not allow bots abusing it.
You might notice, that even if the isHuman() check fails, we still return a 200 status code. This is intentional, by making it seem like submitting the comment was a success, it is harder for a bot to determine if it was detected as a bot or not. Though, depending on your application architecture, you might decide to send a different status code if a bot is detected.
Wrapping it up
Once again, the combination of Storyblok, Netlify, and Vue.js proves to be a very straightforward solution for building robust applications in almost no time.
Although I’m still not quite sure why it’s called “Serverless”, because, after all, it’s server-side JavaScript (aka Node.js) running on a server, it cannot be denied that building applications this way is very convenient.