How to Pre-render Vue.js Powered Websites with webpack
UPDATE: Since I wrote this article, the vue-cli-plugin-prerender-spa was created. I recommend that you take a look at it before you continue with this article.
In my recent article, we built a landing page type website powered by a headless CMS and Vue.js. We’ve seen how quickly we can build a simple site with these two technologies. However, there is still a major problem with the result of our work: the loading performance is pretty terrible.
For single-page applications, the time it takes to load the application for the first time is typically not that important. Because it’s most likely still a lot faster than downloading a native app, ideally, our users open our application regularly, which means we can utilize caching strategies to make sure consecutive visits are speedy.
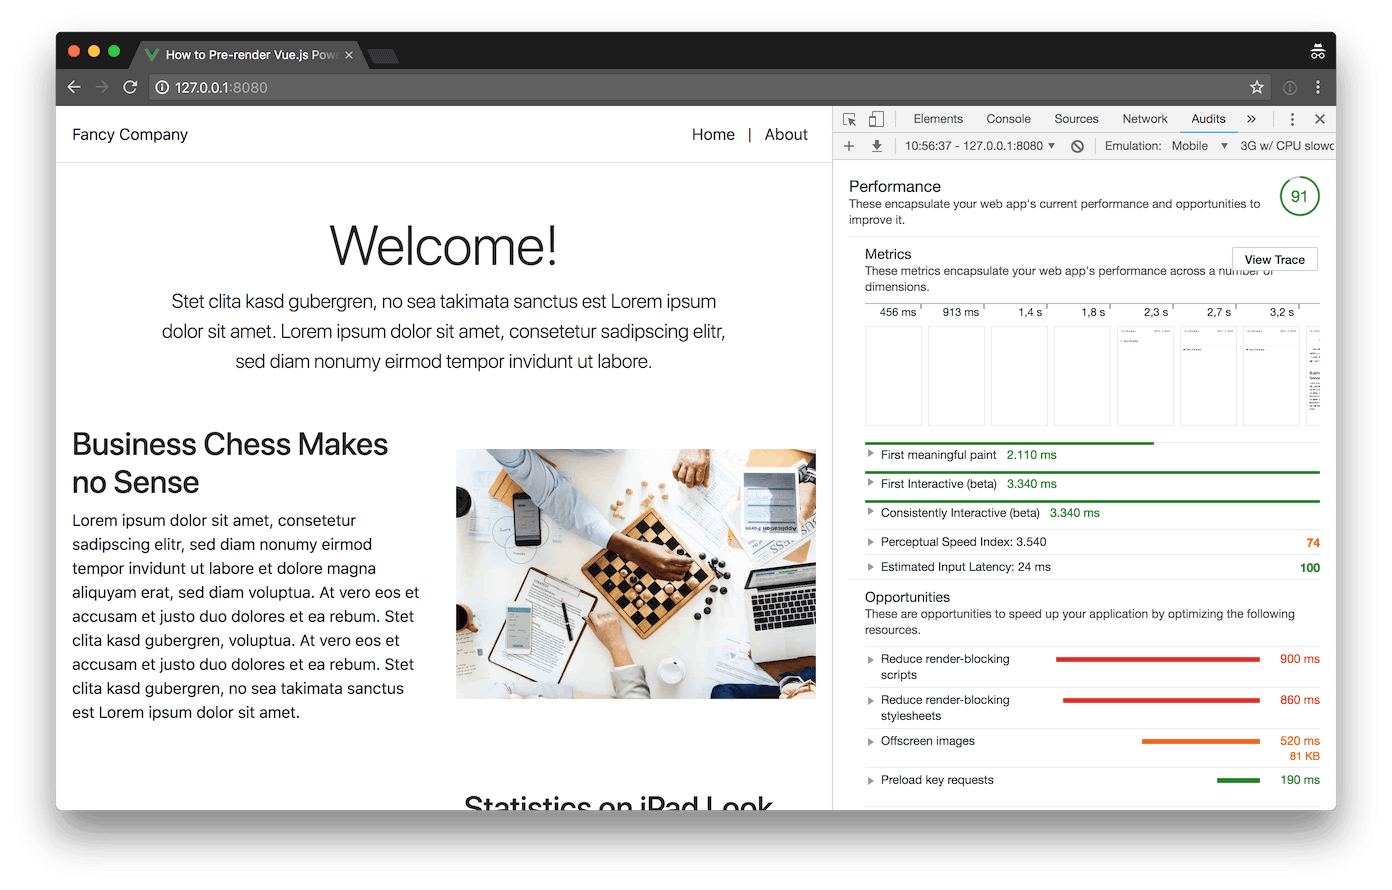
Baseline Lighthouse benchmark result
When building landing pages or brochure sites, things are very different. Usually we want to sell our users something on a landing page. Sometimes this might be a physical or digital product, or it might even be an idea we firmly believe in. No matter what we want to sell, we want our users to see it and we want them to see it fast. If we can’t show it to them fast enough, they might not even stay around long enough to see it at all.
If you want to take a look at the final result, you can view a live demo on Netlify or check out the code on GitHub.
Improving the performance of Vue.js powered websites
Before we get started with optimizing, let’s think about why our simple landing page is slow. Before the browser can render anything, there are three major things that have to happen.
- Load the HTML
- Load and execute the JavaScript code
- Load the data from the headless CMS API.
These three things have to happen one after another and cannot be parallelized. But if we take a closer look, we realize that what we end up with after step 3, is basically static HTML.
So how can we improve the performance of a website which heavily relies on JavaScript templating and rendering? We can use pre-rendering to bypass steps 2 and 3.
Using the Prerender SPA Plugin
Luckily for us, there is the open source community and we have access to the wonderful tool that is the Prerender SPA Plugin to enhance our webpack build process with pre-rendering super powers.
npm install --save-dev prerender-spa-pluginAfter installing the Prerender SPA webpack plugin, we have to add it to our webpack configuration.
// vue.config.js
const path = require("path");
const PrerenderSpaPlugin = require("prerender-spa-plugin");

const productionPlugins = [
  new PrerenderSpaPlugin({
    staticDir: path.join(__dirname, "dist"),
    routes: ["/", "/about"],
    renderer: new PrerenderSpaPlugin.PuppeteerRenderer({
      // We need to inject a value so we're able to
      // detect if the page is currently pre-rendered.
      inject: {},
      // Our view component is rendered after the API
      // request has fetched all the necessary data,
      // so we create a snapshot of the page after the
      // `data-view` attribute exists in the DOM.
      renderAfterElementExists: "[data-view]",
    }),
  }),
];

module.exports = {
  lintOnSave: false,
  configureWebpack: (config) => {
    if (process.env.NODE_ENV === "production") {
      config.plugins.push(...productionPlugins);
    }
  },
};
In the example above, I assume that you’re using the Vue CLI, because I absolutely think you should. If you’re not, you have to modify your webpack config directly. By checking the NODE_ENV before adding our array of productionPlugins to the webpack config, we make sure that it doesn’t unnecessarily slow down the development build.
// src/main.js
import Vue from "vue";

import injectInitialState from "./utils/inject-initial-state";
import router from "./router";
import store from "./store";

import App from "./components/App.vue";

const app = new Vue({
  router,
  store,
  render: (h) => h(App),
});

// During pre-rendering the initial state is
// injected into the global scope, here we
// fill the store with the initial state.
if (window.__INITIAL_STATE__) store.replaceState(window.__INITIAL_STATE__);

router.beforeResolve(async (to, from, next) => {
  try {
    const components = router.getMatchedComponents(to);

    // By using `await` we make sure to wait
    // for the API request made by the `fetch()`
    // method to resolve before rendering the view.
    await Promise.all(components.map((x) => x.fetch && x.fetch({ store })));

    // The `injectInitialState()` function injects
    // the current state as a global variable
    // `__INITIAL_STATE__` if the page is currently
    // pre-rendered.
    if (window.__PRERENDER_INJECTED) injectInitialState(store.state);
  } catch (error) {
    // This is the place for error handling in
    // case the API request fails for example.
    console.log(error);
  }

  return next();
});

app.$mount("#app");
Above you can see our main.js file with the code necessary to fetch the data from the API before every route change. By using this pattern, nothing is rendered until the API request has finished, so there is no flash of empty application. Depending on your application though, you might want to use a different approach. Also, this is a simple example of this pattern, if your situation is more complex, take a look at the official documentation about server-side rendering. You can see, that we’re using the injectInitialState() utility function, if you’re interested in the code, you can look it up on GitHub.
Next, for our application to work correctly, it’s important that the application renders its root element with an id="app" attribute. We update our default layout accordingly to achieve this.
 <template>
-  <div class="LayoutDefault">
+  <div id="app" class="LayoutDefault">
     <div class="d-flex align-items-center p-3 mb-3 mb-md-5 bg-white border-bottom box-shadow">
The view component
Now that we’ve prepared our app for pre-rendering view components, we have to make some updates to the view components themselves. Beneath you can see a shortened version of the Home view component.
<template>
  <div class="Home" data-view>
    <!-- ... -->
  </div>
</template>

<script>
import { mapState } from "vuex";

import { GET_LANDING_PAGE } from "../../store/action-types";
import { HOME } from "../../models/landing-page";
import landingPage from "../../store/modules/landing-page";
import registerStoreModule from "../../utils/register-store-module";

// ...

const STORE_NAMESPACE = "landingPage/home";

export default {
  name: "Home",
  // ...
  fetch({ store }) {
    // Dynamically register the store module
    // for our landing page data.
    registerStoreModule({
      module: landingPage,
      name: STORE_NAMESPACE,
      store,
    });

    // Do not load data again if already in store.
    if (store.state[STORE_NAMESPACE].id) return;

    // Trigger the action for fetching all
    // the necessary data from the API.
    return store.dispatch(`${STORE_NAMESPACE}/${GET_LANDING_PAGE}`, HOME);
  },
};
</script>

<style lang="scss">
/* ... */
</style>
In the first line inside the <template> block, you can see that we’ve added a data-view attribute to the root element. This is a hint for the pre-rendering plugin to know when the page is ready and it can take a snapshot of the HTML.
The fetch() method is where the magic happens. We dynamically register the store module with the help of the registerStoreModule() utility function (if you don’t want to register you store modules dynamically, you can register them as usual and remove this line).
Next we check if the store is already filled (with the data from the __INITIAL_STATE__) and if not, we dispatch the store action to get all the data for our landing page from the headless CMS.
Result
We’ve now successfully added pre-rendering to our application. Let’s run npm run build && npm run serve-production to build our application and serve the production build. Afterwards we can run the Lighthouse audit, which is built in in chrome, again to see the results of our work.
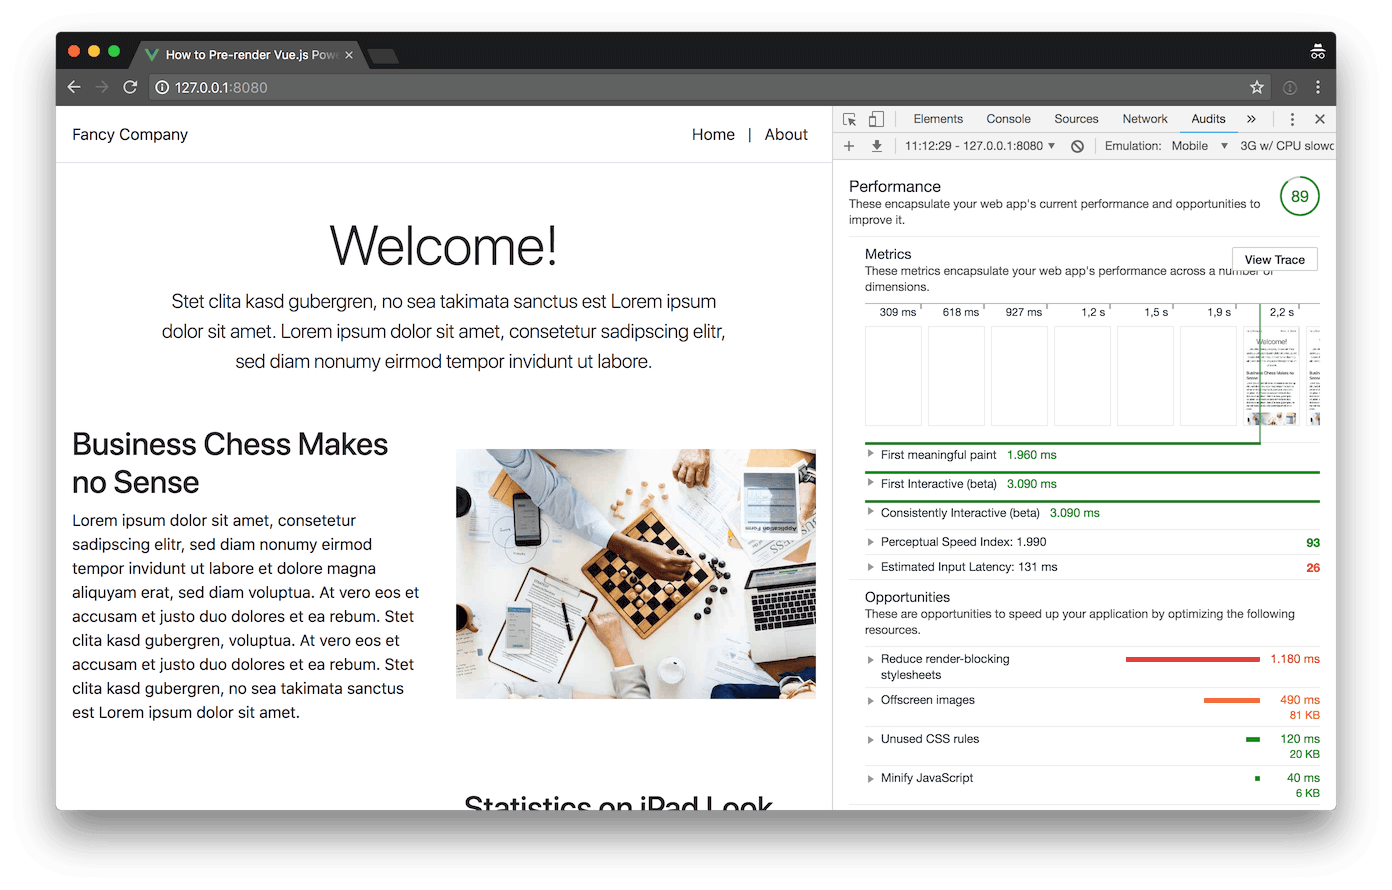
Lighthouse benchmark result of pre-rendered site
Not too shabby, pre-rendering our application shaved off about 150 milliseconds of the first meaningful paint time and improved the perceptual speed index score by quite a lot. Interestingly, the overall score went down 2 points. This is because the estimated input latency of our pre-rendered application is through the roof. I suspect this is because it takes a lot of resources to parse the injected initial state, which is basically a huge JavaScript object and also Vue.js might have problems hydrating the already existing HTML. Although, as we’ll see later in this article, I’ve found a way to improve this, I’m still curious of how to improve the input latency – if you have any tips regarding this topic, please let me know.
Do you want to learn more about testing Vue.js applications?
Register for the Newsletter of my upcoming book: Advanced Vue.js Application Architecture.
Further optimizations
One neat side effect of pre-rendering is that our application now works without JavaScript (at least the initial rendering). Not only is this great for SEO reasons, but consequently, we can make further optimizations to make our application load even faster.
Because we don’t need JavaScript for the initial rendering of our application, we can tell the browser to defer loading of all of our scripts until it feels like it has enough resources to load and parse the JavaScript code.
Unfortunately, although it is possible to use the script-ext-html-webpack-plugin to add defer attributes to all but the main entry script, because what we care about most, is to add the defer attribute to exactly that main entry script, I decided to go for a hacky quick and dirty solution to this problem.
   new PrerenderSpaPlugin({
     staticDir: path.join(__dirname, 'dist'),
     routes: ['/', '/about'],
+    postProcess(renderedRoute) {
+      renderedRoute.html = renderedRoute.html
+        .replace(/<script (.*?)>/g, '<script $1 defer>')
+        .replace('id="app"', 'id="app" data-server-rendered="true"');
+
+      return renderedRoute;
+    },
     renderer: new PrerenderSpaPlugin.PuppeteerRenderer({
       // We need to inject a value so we're able to
       // detect if the page is currently pre-rendered.
The Prerender SPA Plugin provides a way of post processing the HTML before saving it to the disk. We can use the postProcess() hook and some regular expressions magic to add a defer attribute to every script tag. If you’re aware of a better way of adding the defer attribute to every script tag, please let me know. Also we add a data-server-rendered="true" attribute, which tells Vue.js that the HTML of the page is pre-rendered.
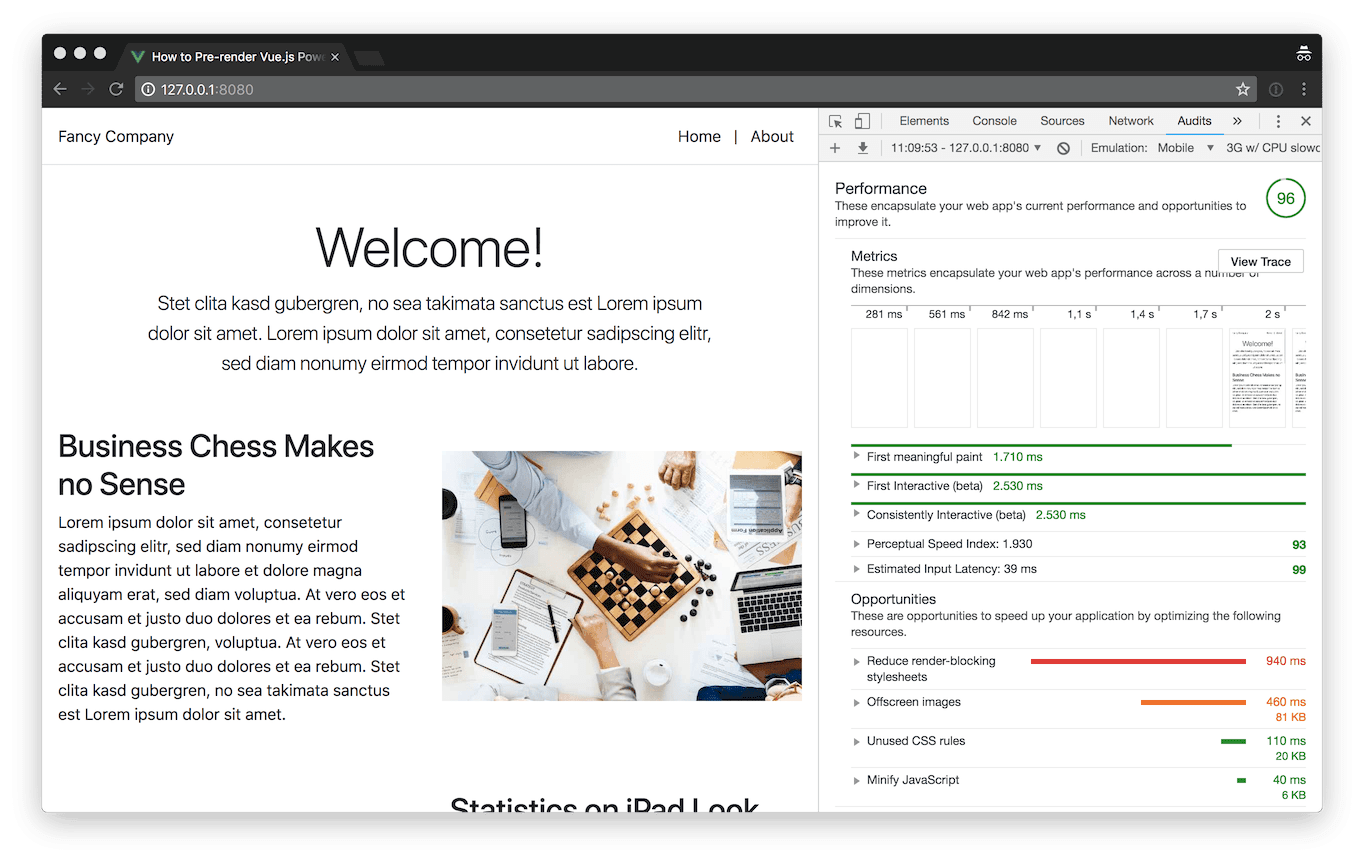
Lighthouse benchmark result of pre-rendered site with deferred JavaScript
By making use of the defer attribute we removed one link from the critical request chain which drastically improves the performance. Thanks to deferred loading, our site now loads a bit faster than before. Keep in mind though, that this application is still by no means well optimized. Because I’m lazy when building those demo applications, I load the entirety of bootstrap while using only a fraction of it (don’t ever do this on a production site!). Also, the critical path CSS could be inlined and image loading could be optimized. But this article is about pre-rendering and we’ve seen significant improvements by applying pre-rendering to our application.
Interestingly enough, telling Vue.js that the HTML is already pre-rendered by adding data-server-rendered="true", the input latency seems to be in much better shape then in our previous test run.
Do you like what you're reading?
Wrapping it up
Although, as we’ve seen in the second benchmark, you have to double check how certain measures affect the performance metrics of your site, we’ve also seen that pre-rendering has huge potential to speed up your site. Keep in mind though, that pre-rendering is not a silver bullet. Depending on which type of application you’re building, there might be better approaches like SSR.
In the next article, we’ll take a look at how we can use Nuxt.js to build sites which not only support pre-rendering but also SSR. You can follow me on Twitter if you don’t want to miss that.