Building Landing Pages with Vue.js and a Headless CMS
Although, nowadays, my main focus at work is to build app like websites, at my former employer, I generally worked on brochure pages. We built a variety of small to medium scale websites powered by the PHP based CMS Drupal.
A couple of days ago, I started thinking about how I would build such sites today. Drupal is a very powerful CMS and there is nothing inherently bad about it, but it’s very heavyweight and the frontend part is pretty outdated. Its strength lies in the editing and management of content, but it is very difficult to adapt the frontend to your own needs.
In today’s article we’ll explore how to combine the power of the headless CMS Contentful with the flexibility of a modern Vue.js frontend stack to build brochure sites and landing pages. We’ll set up our project using the Vue CLI and we’ll use the contentful npm package to fetch data from the Contentful API. Additionally we’ll use Vuex to store the data we’ve fetched from the API.
You can find the complete code, we’ll write in this article, on Github and you can view a demo of the application hosted on Netlify.
About Contentful
There are a ton of headless CMS options out there. Many of them are Open Source and can be self hosted. Although self hosting might seem favorable, nowadays I tend to outsource everything what’s outside of my main area of expertise (which is building complex frontends). Self hosting might seem like the more flexible and cheaper option but rather sooner than later the day comes when a major security vulnerability is discovered and you have to spend hours fixing all of the hacked websites of your clients. Besides that, you have to deal with angry customers and, of course, they don’t want to pay for any of it.
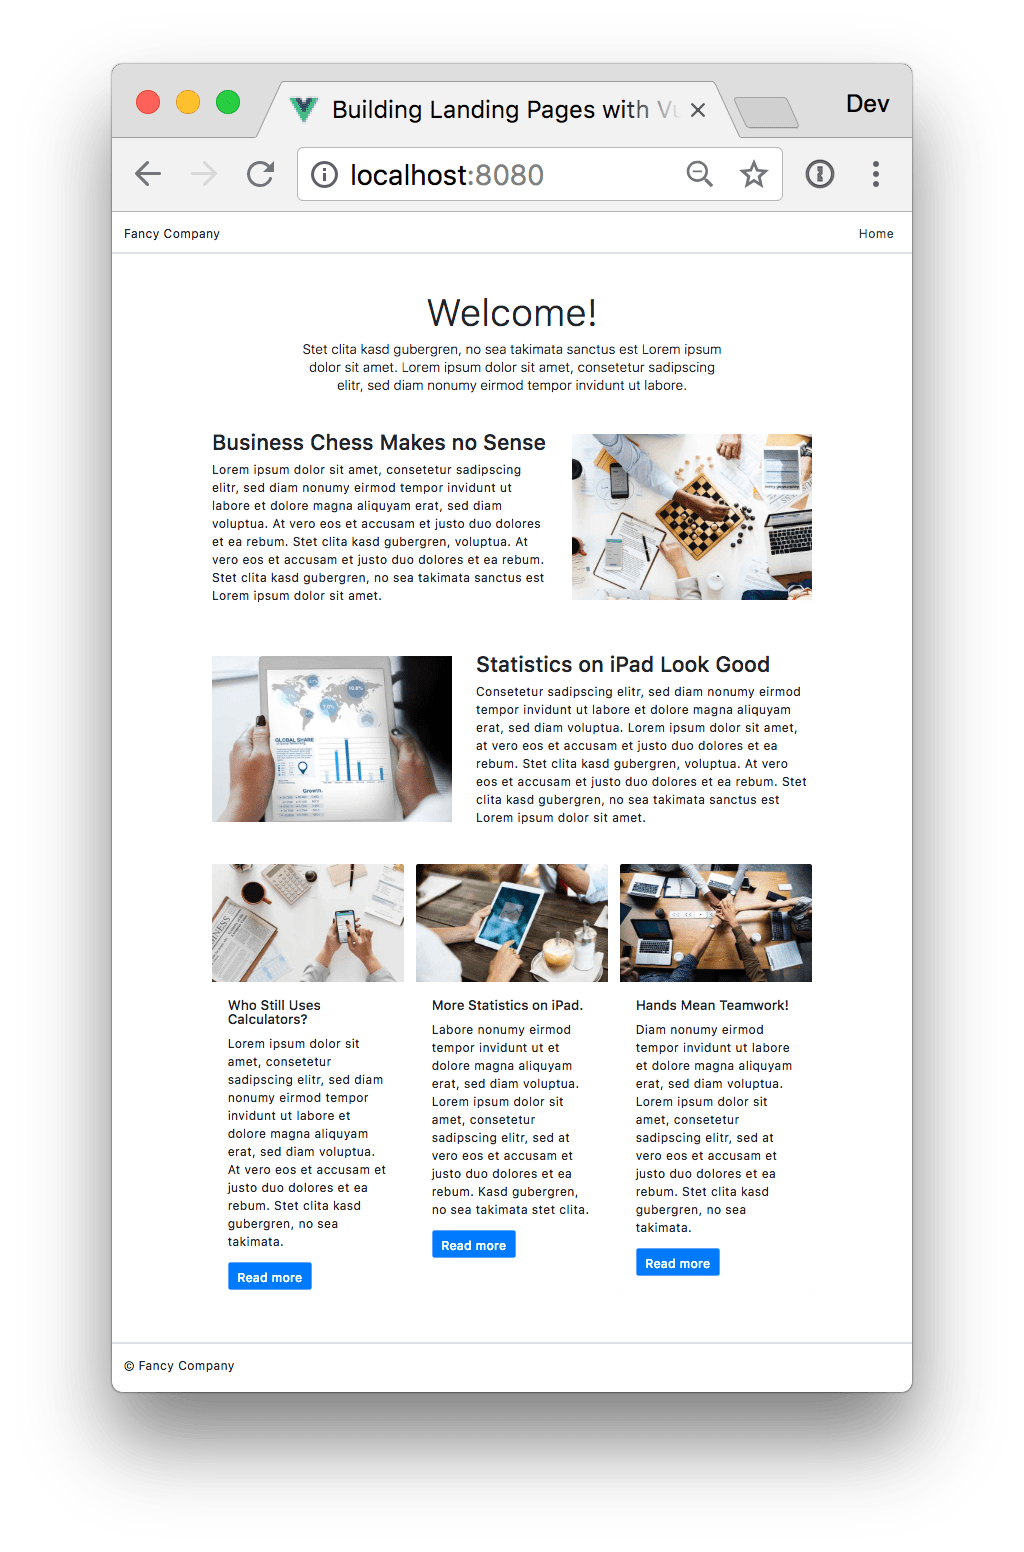
The final result: a landing page rendered by Vue.js
So after experimenting with a lot of self hosted and also cloud hosted headless content management systems, I decided to use Contentful. The user interface is by far the most intuitive of all of the systems I’ve tested. Furthermore it makes it really easy to handle images, so your clients can upload images in any format they wish and the Contentful API will handle cropping and resizing automatically, even with support for face detection.
Although the features of Contentful are pretty awesome, I’m of the opinion, that it’s way too expensive if you’re exceeding the limits of the micro plan. That’s why I’m still searching for a more affordable alternative for clients which, although they have a lot of content, don’t have the budget to spend a fortune every month on their website. If you can recommend me an alternative, please let me know on Twitter.
Creating a Landing Page content type with Contentful
I won’t go into much detail about how to create content types in Contentful. Just let me say that you can create content types for certain pages or sections of your website. You can choose from a handful of fields which you can add to your content types.
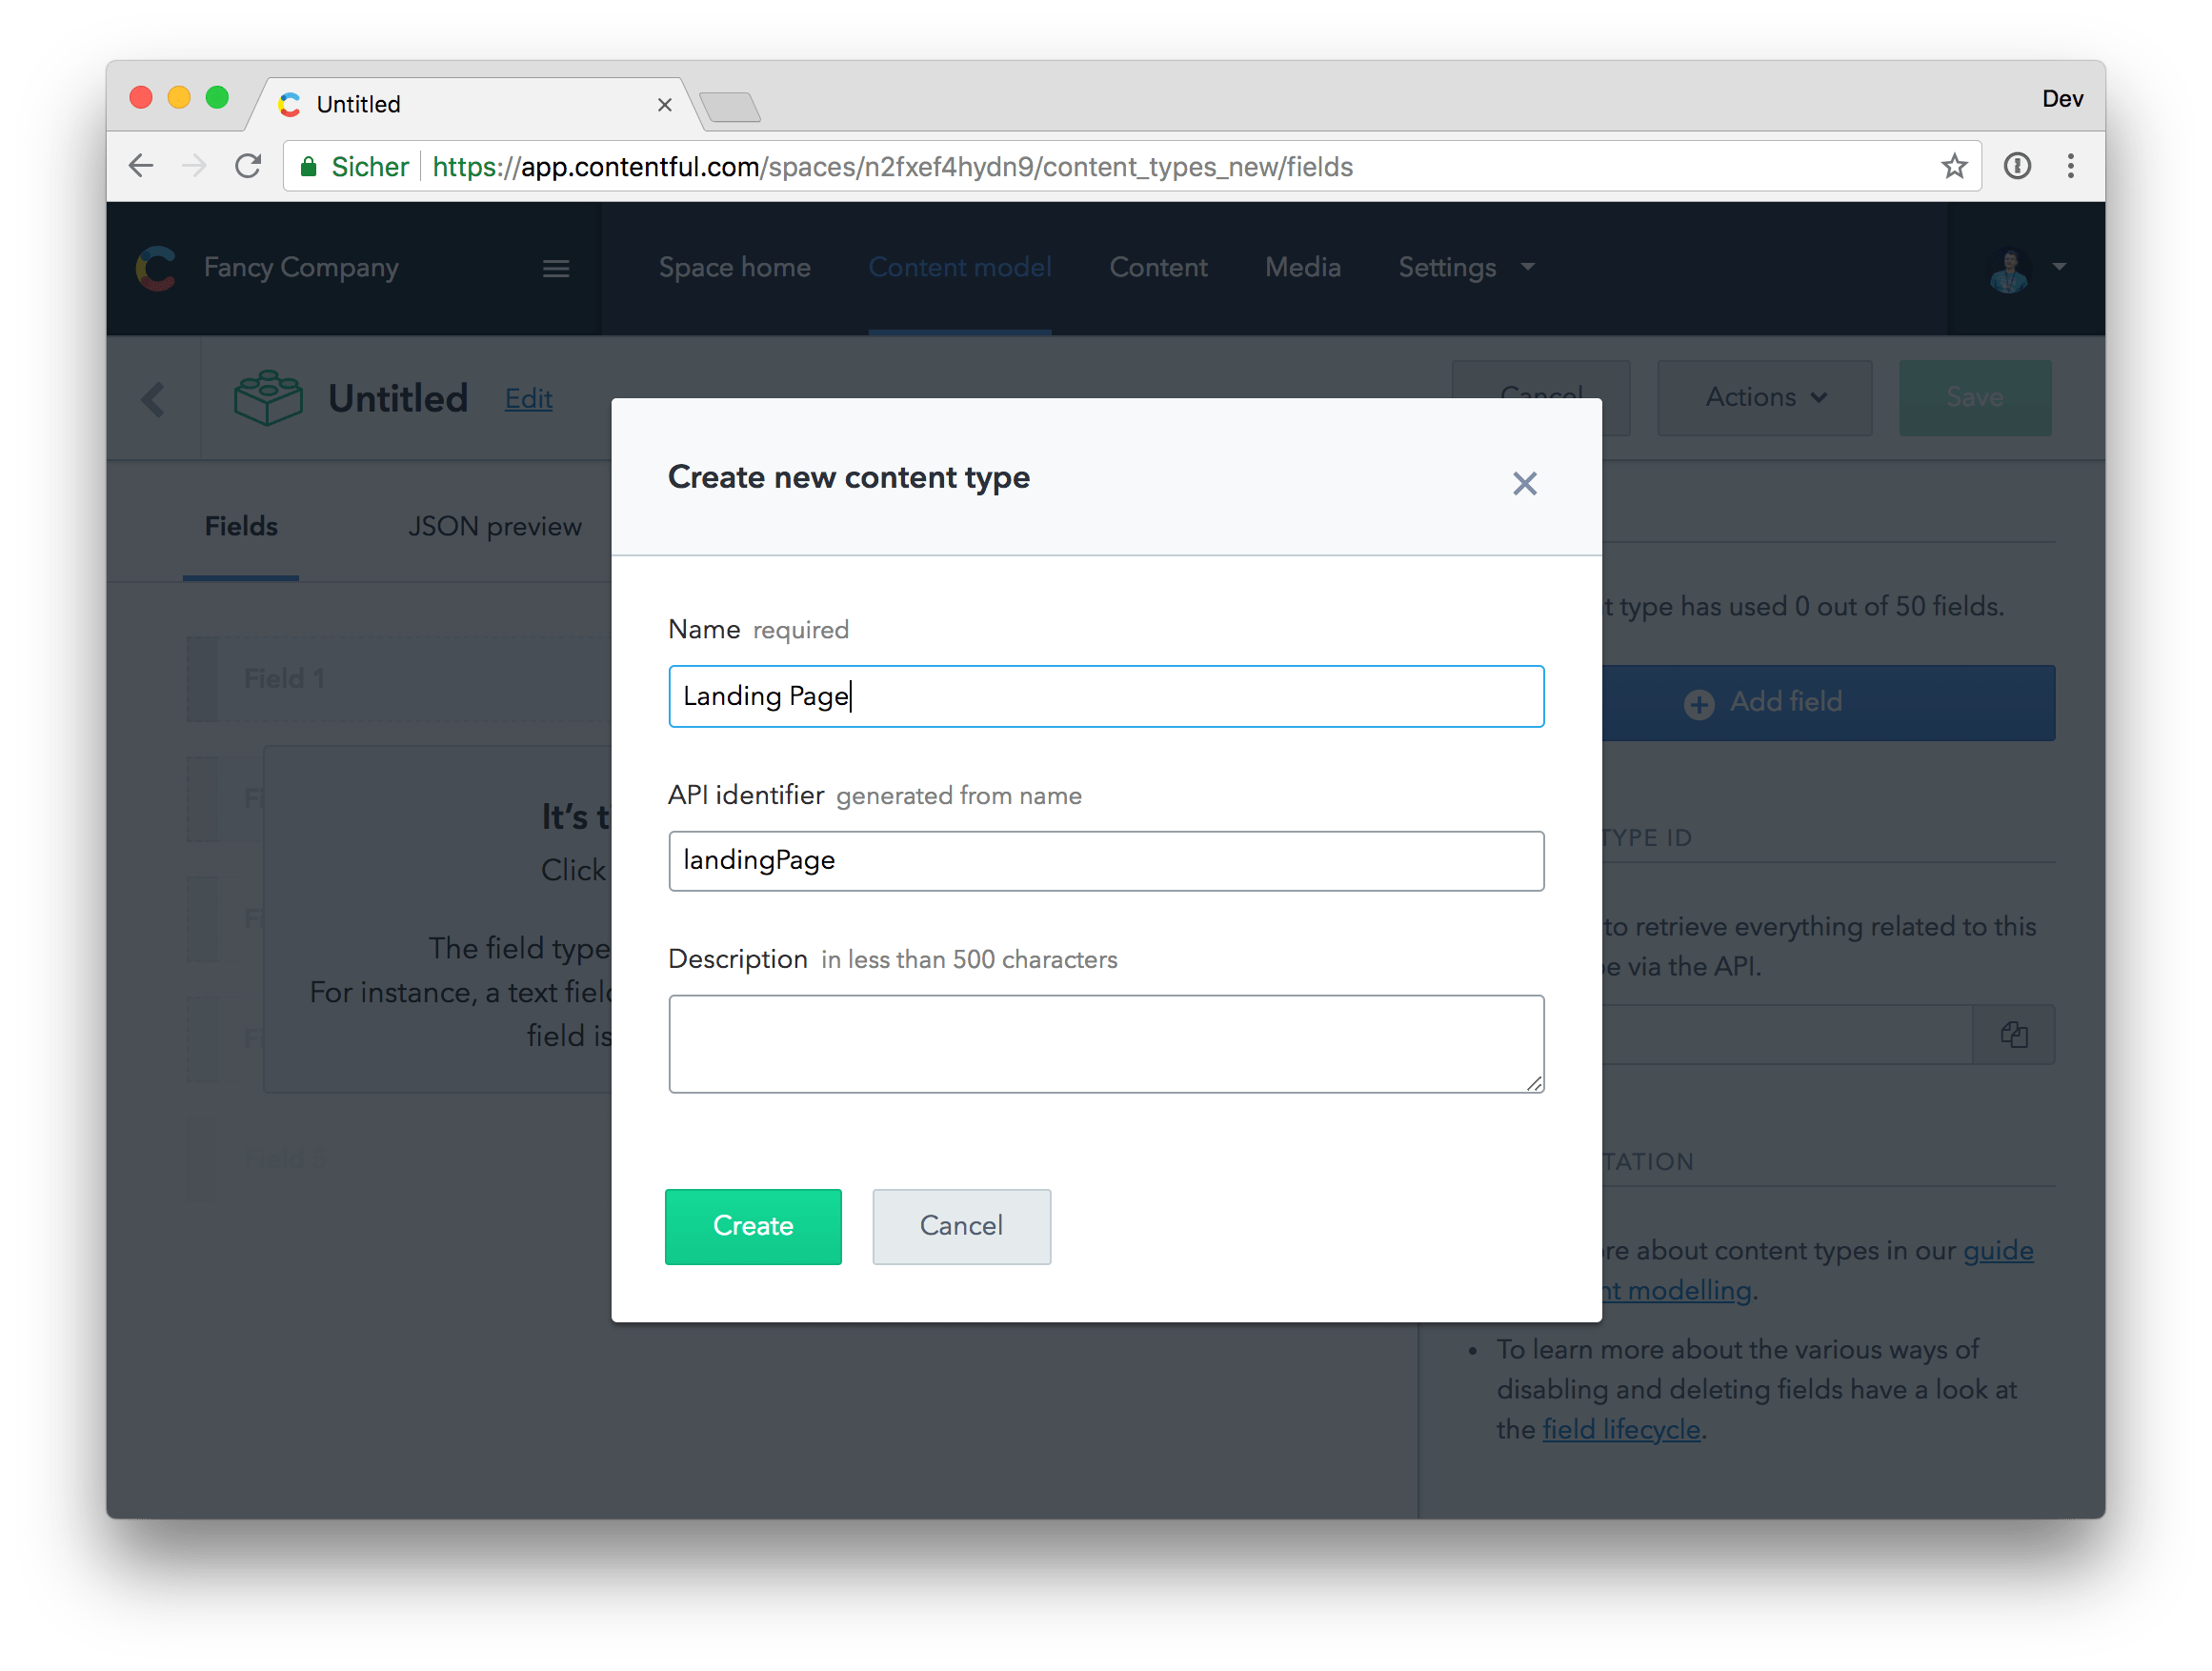
Create a new Landing Page content type in Contentful
The basic elements of our Landing Page content type will be a title (H1) and a short intro text. Furthermore we want to display some text and image content blocks (alternately text left, picture right / picture left, text right) and we want to be able to show a list of teasers at the bottom of the page. For this to work we need two more content types: Content Block and Teaser.
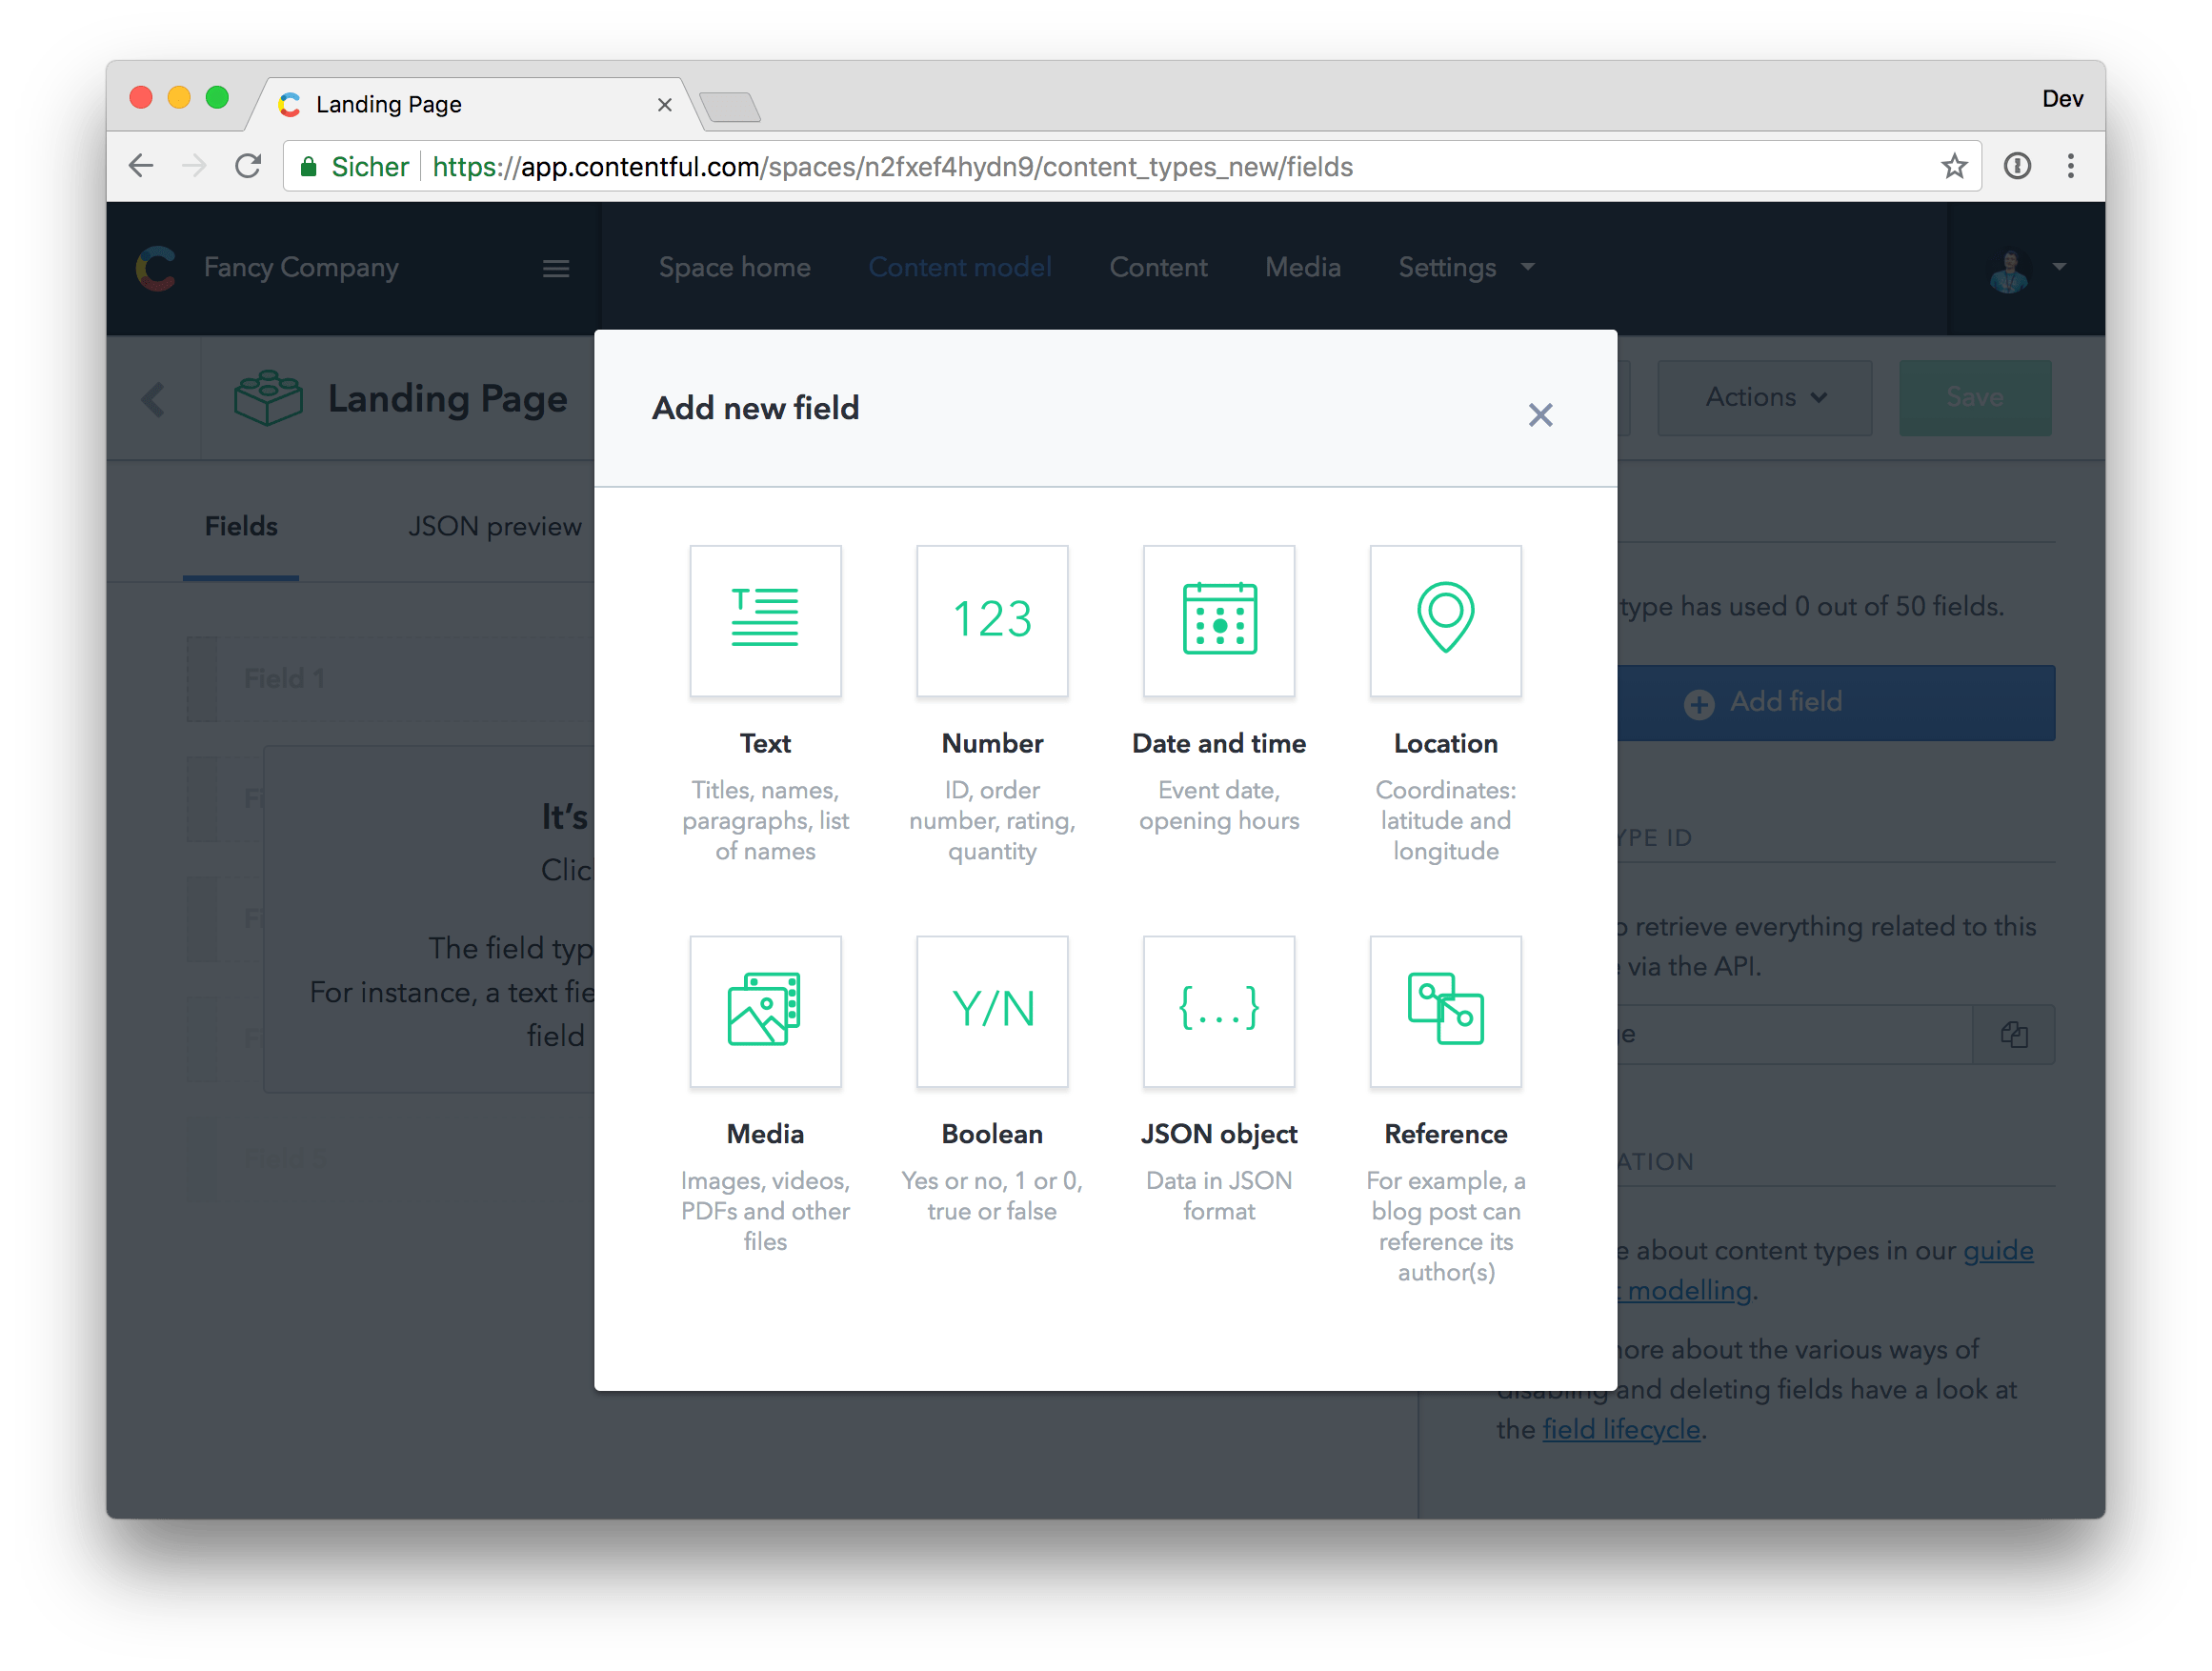
Add new fields to the Landing Page content type
After setting up our Landing Page content type and adding all necessary fields, we’re ready to create our first landing page: the homepage.

Create a new landing page
Setting up the project
Thanks to the awesome Vue CLI, setting up a Vue.js project has never been more convenient. If you want to start from scratch, please follow the instructions in the Vue CLI documentation. Otherwise you can check out the complete code featured in this article on GitHub.
Loading data form Contentful with Vue.js
We’ve set up our content types and created our first landing page, now we’re ready to fetch the data from the Contentful API to use it in our Vue.js application.
npm install --save contentfulAfter installing the contentful npm package, we’re able to create a client instance which we can use to fetch data from the Contentful API.
// src/utils/api.js
import { createClient } from "contentful";

export default createClient({
  space: "n2fxef4hydn9",
  accessToken:
    "14aee5a3c3d231330df1e1c67927059f2280669e615184b69b7eaba4f0aed0ac",
});
The landing page model
In the next step, we create a landing page model that is responsible for fetching the data from the API and bringing it into a format that meets our requirements.
// src/models/landing-page.js
import api from "../utils/api";

// This is the ID of the landing
// page we've created earlier.
export const HOME = "7D8zXfigvuaWiK0IASKiO2";

// The LandingPage class returns a clean
// LandingPage object with only the data we need.
export class LandingPage {
  constructor({ id = null, intro = "", title = "" } = {}) {
    this.id = id;
    this.intro = intro;
    this.title = title;
  }
}

// We use an adapter to bring the API response
// from the Contentful API into the correct format
// for our LandingPage class.
export function responseAdapter({ fields, sys }) {
  return new LandingPage({ ...fields, ...sys });
}

// We wrap the Contentful API client to format
// the response exactly the way we like it.
export default {
  async get(id) {
    return responseAdapter(await api.getEntry(id));
  },
};
Store the data in Vuex
We can now use the model to load and save data to the state using a Vuex action.
// src/store/modules/landing-page.js
import { GET_LANDING_PAGE } from "../action-types";
import { SET_LANDING_PAGE } from "../mutation-types";
import landingPageModel, { LandingPage } from "../../models/landing-page";

export default {
  namespaced: true,
  actions: {
    async [GET_LANDING_PAGE]({ commit }, id) {
      commit(SET_LANDING_PAGE, await landingPageModel.get(id));
    },
  },
  mutations: {
    [SET_LANDING_PAGE](state, landingPage) {
      Object.assign(state, landingPage);
    },
  },
  // We initialize the state with
  // an empty LandingPage object.
  state: () => new LandingPage(),
};
In the code snippet above, you can see the code for our landing page Vuex store module. Because the state property returns a function, we can reuse this store module for multiple landing pages we might create in our application.
The homepage component
Our Vuex store is ready to fetch some data for us, so let’s build a new view component for our homepage.
<template>
  <div class="Home">
    <div class="mb-md-5 mx-auto mb-3 text-center">
      <h1 class="display-4">{{ title }}</h1>
      <p class="lead">{{ intro }}</p>
    </div>
  </div>
</template>

<script>
import { mapActions, mapState } from "vuex";

import { GET_LANDING_PAGE } from "../../store/action-types";
import { HOME } from "../../models/landing-page";
import landingPage from "../../store/modules/landing-page";

const STORE_NAMESPACE = "landingPage/home";

export default {
  name: "Home",
  computed: {
    ...mapState(STORE_NAMESPACE, ["intro", "title"]),
  },
  created() {
    // Dynamically register the landing page store module in
    // a custom namespace which is only used by this component.
    this.$store.registerModule(STORE_NAMESPACE, landingPage);

    // Do not fetch data again if it has been fetched already.
    if (this.$store.state[STORE_NAMESPACE].id) return;

    this.getLandingPage(HOME);
  },
  methods: {
    ...mapActions(STORE_NAMESPACE, {
      getLandingPage: GET_LANDING_PAGE,
    }),
  },
};
</script>
The src/components/views/Home.vue view component you can see above, dynamically registers the landing page store module we’ve built earlier and triggers the GET_LANDING_PAGE action to fetch the landing page data from Contentful. In the screenshot below, you can see the current look of our application.

The title and the intro text are coming from Contentful
Do you want to learn more about advanced Vue.js techniques?
Register for the Newsletter of my upcoming book: Advanced Vue.js Application Architecture.
Rendering the content blocks
Because our content blocks landing page field is a reference field referencing the content block content type, we need to make some changes to our landing page model because, by default, the Contentful JavaScript client does not resolve references.
 // ...

 // We use an adapter to bring the API response
 // from the Contentful API into the correct format
 // for our LandingPage class.
-export function responseAdapter({ fields, sys }) {
-  return new LandingPage({ ...fields, ...sys });
+export function responseAdapter(response) {
+  const { fields, sys } = response.sys.type === 'Array'
+    ? response.items[0]
+    : response;
+
+  return new LandingPage({ ...fields, ...sys });
 }

 // We wrap the Contentful API client to format
 // the response exactly the way we like it.
 export default {
   async get(id) {
-    return responseAdapter(await api.getEntry(id));
+    return responseAdapter(await api.getEntries({ 'sys.id': id }));
   },
 };
Instead of using the getEntry() method to retrieve a single entity, we now use the getEntries() method. The reason why we’re using getEntries() is because this method resolves all references (to our content blocks for example) automatically for us. But because getEntries() returns an array, we have to make some additional changes to our model so everything works with either arrays or single entities.
Resolving content blocks
Next we have to add the content blocks data to our model. Before we can do this though, we need a new ContentBlock model.
export class ContentBlock {
  constructor({
    id = null,
    image = "",
    position = "",
    text = "",
    title = "",
  } = {}) {
    this.id = id;
    this.image = image;
    this.position = position;
    this.text = text;
    this.title = title;
  }
}

export function responseAdapter(response) {
  const { fields, sys } =
    response.sys.type === "Array" ? response.items[0] : response;

  return new ContentBlock({ ...fields, ...sys });
}
The content block content type contains an image field, images and other assets are basically entities of the content type asset which are referenced by the parent entity. So we need yet another model for our image field.
export class Image {
  constructor({ id = null, url = "" } = {}) {
    this.id = id;
    this.url = url;
  }
}

export function responseAdapter({ fields, sys }) {
  return new Image({ ...sys, url: fields.file.url });
}
The image model is quiet simple, we only need the ID and the URL of the image. Now that we have all the content models we need, we can start to assemble them.
+import { responseAdapter as imageResponseAdapter } from './image';
+
 export class ContentBlock {
   constructor({
     id = null,
     image = '',
     position = '',
     text = '',
     title = '',
   } = {}) {
     this.id = id;
     this.image = image;
     this.position = position;
     this.text = text;
     this.title = title;
   }
 }

 export function responseAdapter(response) {
   const { fields, sys } = response.sys.type === 'Array'
     ? response.items[0]
     : response;

+  const image = imageResponseAdapter(fields.image);
+
-  return new ContentBlock({ ...fields, ...sys });
+  return new ContentBlock({ ...fields, ...sys, image });
 }
First we use the image model to resolve the image field inside of our content block model. In the following code snippet, we add the content block model to our landing page model.
 import api from '../utils/api';
+import { responseAdapter as contentBlockResponseAdapter } from './content-block';

 // This is the ID of the landing
 // page we've created earlier.
 export const HOME = '7D8zXfigvuaWiK0IASKiO2';

 // The LandingPage class returns a clean
 // LandingPage object with only the data we need.
 export class LandingPage {
   constructor({
+    contentBlocks = [],
     id = null,
     intro = '',
     title = '',
   } = {}) {
+    this.contentBlocks = contentBlocks;
     this.id = id;
     this.intro = intro;
     this.title = title;
   }
 }

 // We use an adapter to bring the API response
 // from the Contentful API into the correct format
 // for our LandingPage class.
 export function responseAdapter(response) {
   const { fields, sys } = response.sys.type === 'Array'
     ? response.items[0]
     : response;

+  const contentBlocks = fields.contentBlocks
+    .map(x => contentBlockResponseAdapter(x));
+
-  return new LandingPage({ ...fields, ...sys });
+  return new LandingPage({ ...fields, ...sys, contentBlocks });
 }
The content block component
Now that our basic data structure is set up, we can update our Vue.js application to render the content blocks.
<template>
  <div class="AppContentBlock">
    <div class="AppContentBlock__body">
      <h2>{{ title }}</h2>
      <p>{{ text }}</p>
    </div>
    <div
      v-if="image"
      :class="{ 'AppContentBlock__figure--left': position === 'left' }"
      class="AppContentBlock__figure"
    >
      <img :src="imageSrc" :srcset="imageSrcset" />
    </div>
  </div>
</template>

<script>
export default {
  name: "AppContentBlock",
  props: {
    image: {
      type: Object,
      default: null,
    },
    position: {
      type: String,
      default: "right",
    },
    text: {
      type: String,
      required: true,
    },
    title: {
      type: String,
      required: true,
    },
  },
  computed: {
    imageSrc() {
      if (!this.image) return null;
      return `${this.image.url}?w=360&h=250&fit=thumb&fm=jpg&fl=progressive&q=70`;
    },
    imageSrcset() {
      if (!this.image) return null;
      return `${this.image.url}?w=720&h=500&fit=thumb&fm=jpg&fl=progressive&q=40 2x`;
    },
  },
};
</script>

<style lang="scss">
/* ... */
</style>
Above you can see the AppContentBlock component which is responsible for rendering a single content block entity. Note that we’re using the Contentful image API to automatically generate images for us in both, non-retina (imageSrc) and retina (imageSrcset) resolutions. The w=360&h=250 parameters define the size of the image, fit=thumb is for resizing and cropping the image, fm=jpg makes sure the image is a jpg file, fl=progressive makes the jpg progressive which provides a better loading behavior and q=70 sets the jpg quality (we can use a very low quality of q=40 for our retina version because of the high resolution the file will still look good).
Finally we can integrate the AppContentBlock component into our Home view component.
       </p>
     </div>
+    <div class="Home__content-blocks">
+      <app-content-block
+        v-for="contentBlock in contentBlocks"
+        :key="contentBlock.id"
+        v-bind="contentBlock"
+      />
+    </div>
   </div>
 </template>
Rendering the teasers
Last but not least, there is only one thing missing from our landing page: the teasers at the bottom. Rendering the teasers works basically the same as rendering the content blocks, so I won’t repeat everything again. Instead, you can take a look at the commit at GitHub.
The landing page with teasers
Wrapping it up
Although this approach is already quite powerful, there remain two problems with this methodology: SEO and initial page load performance. But there are ways around those issues, if you’re interested in how we can use pre-rendering for boosting the initial page load time and delivering static HTML to search engines, you can read the next article about this topic.
Building landing pages and brochure style websites with modern web technologies is awesome. By utilizing the power of headless, cloud hosted content management systems, you can build complex landing pages in a matter of hours. This is definitely the way how I’ll build landing pages and brochure sites in the future.