Visual Regression Testing with Nightwatch.js and Cucumber.js
As most of my regular readers have probably already noticed, I’m a huge fan of testing all the things. In many of my recent articles, we’ve already explored multiple techniques for unit testing and acceptance testing.
Unit testing ensures that certain parts (or units) of our code do work correctly; with acceptance testing, we can guarantee that what we’ve built does what it should do. Visual regression testing makes it possible that we can test if our application looks the way it’s supposed to look. At least after we’ve defined a reference point for how it should look.
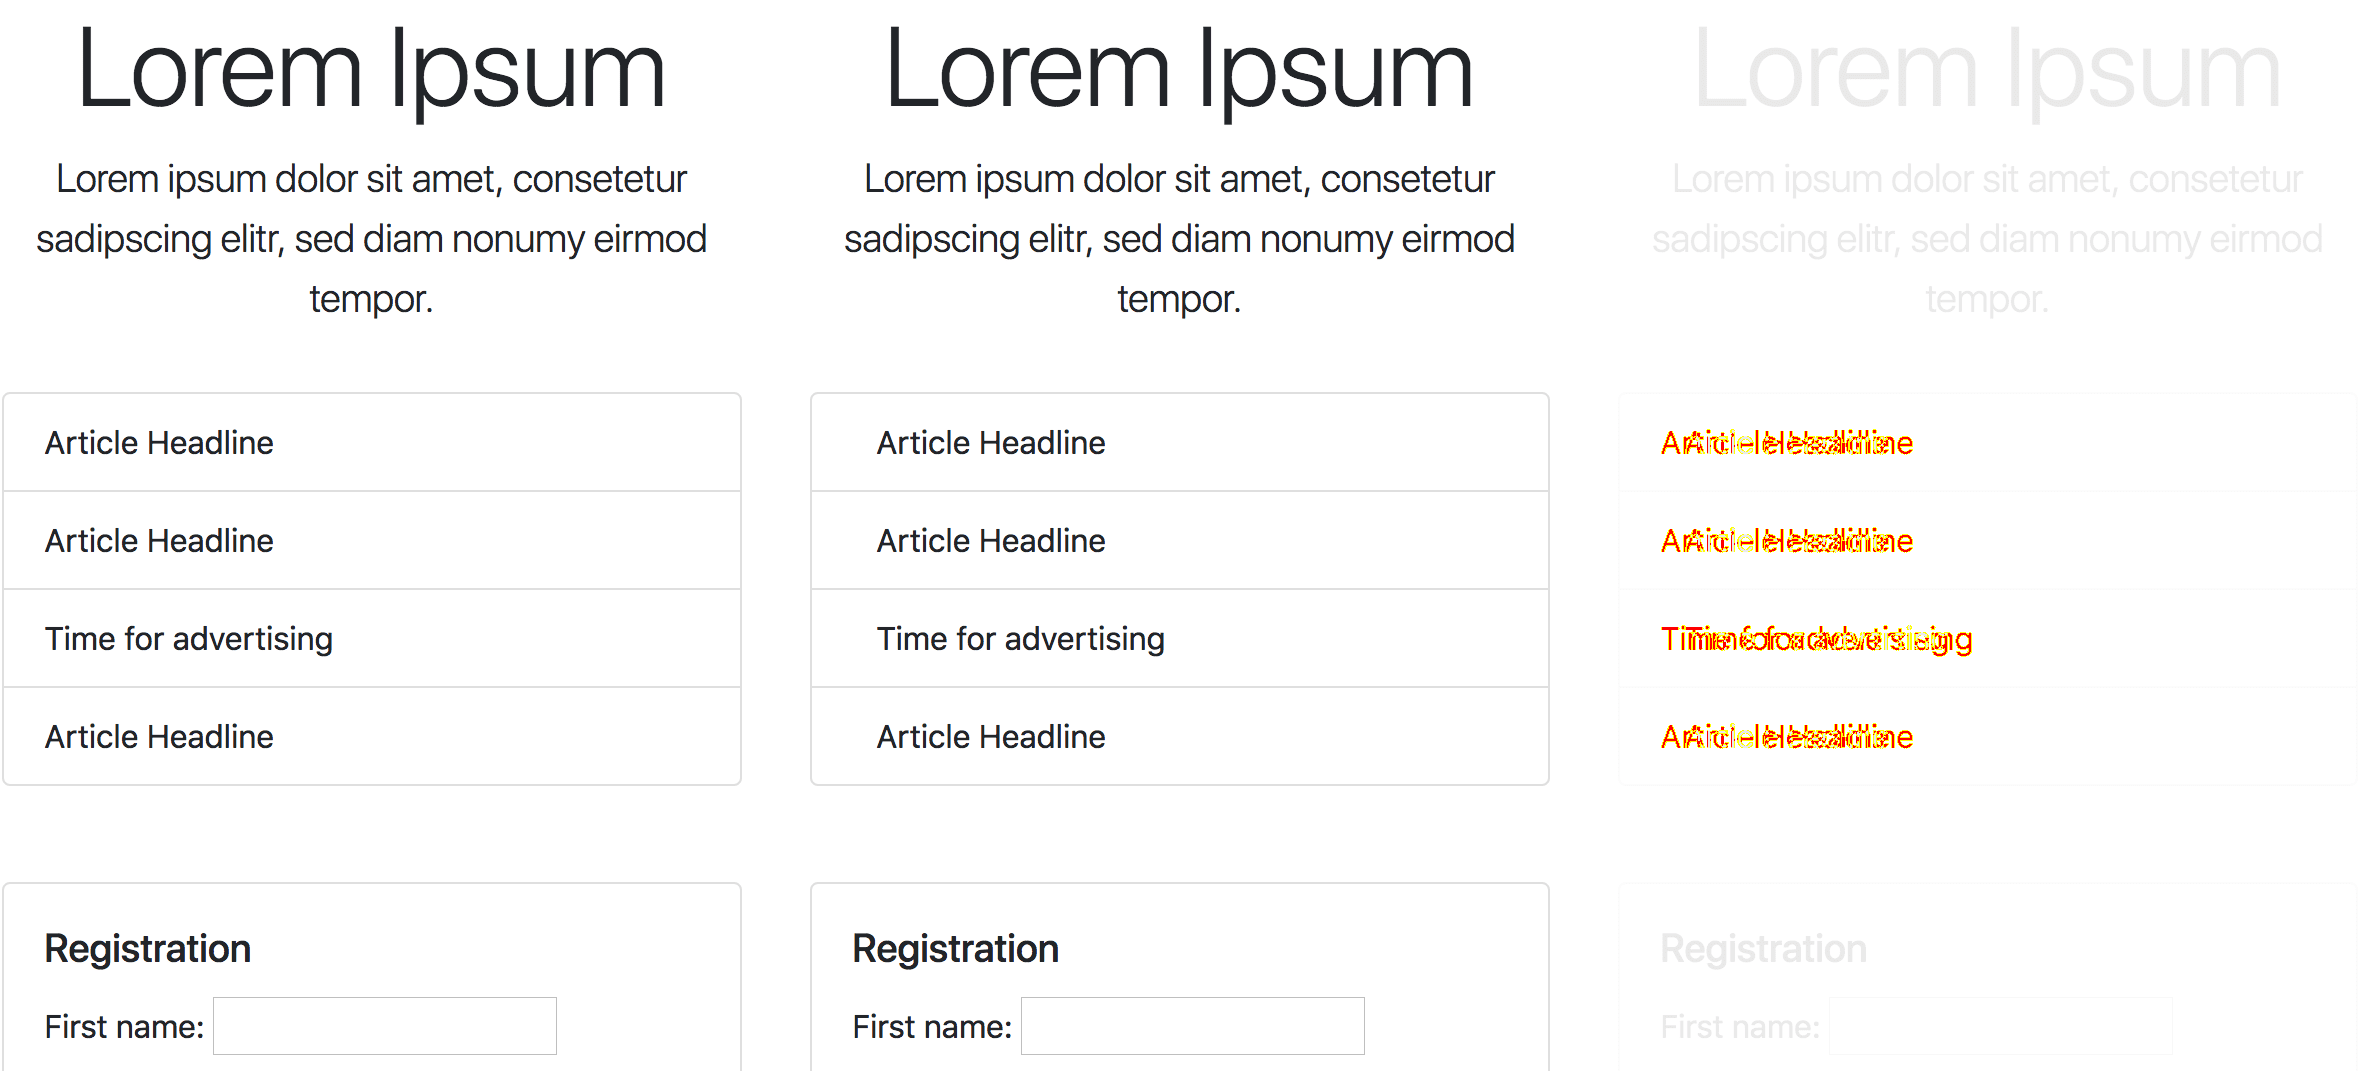
Screenshots of the reference (left) and current (middle) representations of a page and the diff of both (right)
As our applications grow, not only in size but also in complexity, it can become close to impossible to keep track of in which places a particular component is used and how a specific component should look like in a particular context. With visual regression testing, we can automate the process of making sure that changes to the style of a component (or some other part of the application) in one context don’t have unwanted side effects in another context in which the element is used.
In order to keep this article as concise as possible, I focus to show only the code absolutely necessary for the techniques described in this article to work. If you want to see the full code, including the Nightwatch.js and Cucumber.js setup, you can find it on GitHub.
The tools
In the process of researching for this article, I discovered that there is a huge number of tools for performing visual regression tests. You can find a comprehensive list of tools and information about the topic of regression testing on GitHub.
Initially, I planned to use BackstopJS because I have already experience with it using it for avalanche, which is a SCSS framework of mine. But thinking about it further, I’ve come to the realization, that I already have a pretty powerful testing tool to my disposal in most of my projects (Nightwatch.js) and adding another tool might not be necessary at all.
After doing a little bit more research, I concluded, that implementing visual regression tests should be a quite accomplishable task using Nightwatch.js, Cucumber.js and the image comparison library pixelmatch.
Image diffing with pixelmatch
Let’s start with the most complicated task: comparing screenshots created by Nightwatch.js to detect (unwanted) regressions.
npm install --save-dev pngjs pixelmatchFirst of all, we need to install all the dependencies we need. You can do this by running the command above in your CLI tool of choice.
// test/helpers/image-diff.js
const { PNG } = require("pngjs");
const fs = require("fs");
const pixelmatch = require("pixelmatch");

function compare({ currentImage, name, referenceImage }) {
  return new Promise((resolve, reject) => {
    let img1;
    let img2;
    let imagesParsed = false;

    function matchImages() {
      // Make sure both, img1 and img2 were parsed.
      if (!imagesParsed) {
        imagesParsed = true;
        return;
      }

      const diff = new PNG({ width: img1.width, height: img1.height });
      // pixelmatch returns 0 if the images match exactly,
      // it returns a value > 0 if they don't match.
      const imageMismatch = pixelmatch(
        img1.data,
        img2.data,
        diff.data,
        img1.width,
        img1.height,
        {
          threshold: 0.1,
        },
      );

      if (imageMismatch) {
        // If the images do not match exactly, the promise
        // is rejected which we'll later use to make our test fail.
        reject(new Error(`${name} does not look the same as before.`));
      }

      resolve(true);
    }

    // The reference image and the current image are asynchronously
    // read and parsed, not until both of them were parsed, they are
    // compared and the promise returned by the `compare()` function
    // is either resolved or rejected.
    img1 = fs
      .createReadStream(referenceImage)
      .pipe(new PNG())
      .on("parsed", matchImages);
    img2 = fs
      .createReadStream(currentImage)
      .pipe(new PNG())
      .on("parsed", matchImages);
  });
}

module.exports = {
  compare,
};
Let’s go through this quite long code snippet you can see above. The function takes the path to the image which shows how the page currently looks (currentImage), the name to identify the current test case (name) and the path to the image which shows how the page is supposed to look (referenceImage) as its parameters.
The private matchImages() function is called every time one of the two images (reference and current representation) is successfully parsed. But only when the first image was already parsed and the parsing callback function of the second image triggers the function again, either the function rejects (if the images do not match) or resolves the promise.
Create a report on error
We can already use the compare() function we’ve created to check if two screenshots do match or not. But for our visual regression testing workflow to be useful in the everyday development process, we need a visual feedback to see the difference between the current and the reference representation.
 const { PNG } = require('pngjs');
 const fs = require('fs');
+const path = require('path');
 const pixelmatch = require('pixelmatch');
For our reporter function, we need the path dependency, so we import it at the top of our test/helpers/image-diff.js file.
// test/helpers/image-diff.js
// ...

const reportsDirectory = path.resolve(
  __dirname,
  "..",
  "reports",
  "visual-regression",
);

function imagePath({ base, name, suffix = "" }) {
  return path.resolve(base, `${name.replace(/ /g, `-`)}${suffix}.png`);
}

function createReport({ currentImage, diff, name, referenceImage }) {
  const reportCurrentImage = imagePath({
    base: reportsDirectory,
    name,
    suffix: "-CURRENT",
  });
  const reportReferenceImage = imagePath({
    base: reportsDirectory,
    name,
    suffix: "-REFERENCE",
  });
  const reportDiffImage = imagePath({
    base: reportsDirectory,
    name,
    suffix: "-DIFF",
  });

  // Create the directory where we want to
  // save regression reports if it doesn't exist.
  if (!fs.existsSync(reportsDirectory)) {
    fs.mkdirSync(reportsDirectory);
  }

  // Copy the screenshots of the current and the
  // reference representation into the reports directory.
  fs.createReadStream(currentImage).pipe(
    fs.createWriteStream(reportCurrentImage),
  );
  fs.createReadStream(referenceImage).pipe(
    fs.createWriteStream(reportReferenceImage),
  );
  // Create a diff of the two given images and save
  // the newly created image in the reports directory.
  diff.pack().pipe(fs.createWriteStream(reportDiffImage));

  return reportDiffImage;
}

// ...
The createReport() function you can see above, does two things: copying the reference and current representation of the screenshots, and creating a new diff image in the reports directory. We end up with a report in the form of three images which we can use to determine if an unwanted regression has happened.
 function compare({ currentImage, name, referenceImage }) {
   return new Promise((resolve, reject) => {
       // ...

       if (imageMismatch) {
+        const reportDiffImage = createReport({
+          currentImage,
+          diff,
+          name,
+          referenceImage,
+        });
+
         // If the images do not match exactly, the promise
         // is rejected which we'll later use to make our test fail.
-        reject(new Error(`${name} does not look the same as before.`));
+        reject(new Error(`${name} does not look the same as before. See diff: ${reportDiffImage}`));
       }

       resolve(true);
     }

     // ...
   });
 }

 module.exports = {
   compare,
+  imagePath,
 };
In the diff above you can see the updated compare() function which now uses the createReport() function, to create a report if a mismatch between the two screenshots is detected.
Step definitions for visual regression testing
Now that we’ve created the basic functionality for comparing screenshots and detecting visual regressions, we can proceed with defining step definitions for testing visual regressions with Nightwatch.js and Cucumber.js.
npm install --save-dev tmpFor our test setup to work, we need to take screenshots every time we run our tests. By using the tmp package, we can make sure to store those screenshots only temporarily without us having to worry about cleaning them up ourselves.
// test/step-definitions/visual-regression.js
const { client } = require("nightwatch-cucumber");
const fs = require("fs");
const path = require("path");
const tmp = require("tmp");

const { compare, imagePath } = require("../helpers/image-diff");
const { When, Then } = require("../helpers/step");

// This is the (temporary) directory where we save the
// screenshots of the current representation of the page.
const currentDirectory = tmp.dirSync().name;
// Reference screenshots are saved in this directory
// you absolutely should add this directory to version control.
const referenceDirectory = path.resolve(__dirname, "..", "visual-reference");

When(/^I look at (.*?)$/, (name) => {
  const currentImage = imagePath({ base: currentDirectory, name });
  const referenceImage = imagePath({ base: referenceDirectory, name });

  // If no reference image exists yet, a new one is created.
  if (!fs.existsSync(referenceImage)) {
    // eslint-disable-next-line no-console
    console.info(
      `INFO: Reference image successfully created: ${referenceImage}`,
    );
    client.saveScreenshot(referenceImage);
  }

  return client.saveScreenshot(currentImage);
});

Then(/^I expect (.*?) to look the same as before$/, async (name) => {
  const currentImage = imagePath({ base: currentDirectory, name });
  const referenceImage = imagePath({ base: referenceDirectory, name });

  // If the images match, the test succeeds, else it fails.
  return compare({ currentImage, name, referenceImage });
});
In the code above, you can see the two step definitions we’ll use in the next step to define our visual regression tests in Gherkin syntax.
Using Gherkin to define visual regression tests
At this point at the latest, some people might argue, that acceptance tests, written in Gherkin syntax, are not necessarily the best way to deal with visual regression testing. On the one hand, they are absolutely right: visual regression testing has nothing to do with BDD for which Gherkin is primarily intended. On the other hand though, I’d say it can be very nice to have all the tests for your frontend in one place. So why not write visual regression tests in Gherkin?
@visual-regression
Scenario: The homepage looks as expected

  Given I view the page on a small screen device
  When I open "http://localhost:8080"
  And I look at the homepage
  Then I expect the homepage to look the same as before
The step And I look at the homepage in the test scenario above, takes a screenshot of the homepage (which is the name of the regression test case) and then compares the screenshot with the reference image in the step Then I expect the homepage to look the same as before. It is important to use the same name (the homepage) in the first and also the second step.
The tag @visual-regression is added, to make it possible to run only (or all but) visual regression tests.
Working with visual regression tests
Now that we’ve implemented the core functionality to enable visual regression tests with Nightwatch.js and Gherkin syntax, let’s take a look at how a typical – regression testing enhanced – workflow can look like.
Running the tests
Let’s start with adding a new npm script to our package.json file, to make it easier to run our regression tests.
{
  "scripts": {
    "test:acceptance": "nightwatch -c test/conf.nightwatch.js --skiptags visual-regression",
    "test:visual-regression": "nightwatch -c test/conf.nightwatch.js --tags visual-regression"
  }
}
In the example above, you can see two scripts. The first one test:acceptance is the script to trigger our regular acceptance tests. By specifying the --skiptags option, with the tag we’ve defined for our regression tests as its value, we’re making sure that all visual regression tests are skipped.
The second script test:visual-regression works in the opposite direction and triggers Nightwatch.js to run only scenarios tagged with @visual-regression. By running npm run test:visual-regression in your CLI utility of choice, you can start the visual regression tests.
Create the initial reference images
At the first execution of npm run test:visual-regression, new reference images are generated automatically. You should add those newly created reference images to the index of your version control system.
You can now start working on your application and make changes to it. If you later run npm run test:visual-regression again, you’ll most likely see your tests fail because the reference screenshot created earlier, does not match the current state of things.
If you take a look at the screenshots created in the reports directory, you should only see differences that you’ve intended with the changes you made to your application. If there are differences you did not expect, you’ve successfully used visual regression testing to find an unintended regression.
Update existing reference images
After you’ve made changes to your application, ran the regression tests and you’ve found unwanted regressions, it’s time to fix your implementation. Assuming you’ve fixed the implementation and in the report screenshots created by the failing test you can now only see differences you actually intended, you want to update the affected reference images.
You can do so, by deleting the reference images you want to update, and run the tests again. Although this is a simple and effective method, it can become quite tedious to do so after your test base has grown to include a few dozen reference screenshots or more.
Instead, we also can enhance our step definition, for creating the screenshots of the current and the reference representation, with some additional code which makes it possible to create new reference images on-demand.
 const referenceDirectory = path.resolve(__dirname, `..`, `visual-reference`);

 When(/^I look at (.*?)$/, (name) => {
+  const referenceRun = process.argv.includes(`visual-regression-reference`);
+
   const currentImage = imagePath({ base: currentDirectory, name });
   const referenceImage = imagePath({ base: referenceDirectory, name });

   // If no reference image exists yet, a new one is created.
-  if (!fs.existsSync(referenceImage)) {
+  if (referenceRun || !fs.existsSync(referenceImage)) {
     // eslint-disable-next-line no-console
     console.info(`INFO: Reference image successfully created: ${referenceImage}`);
     client.saveScreenshot(referenceImage);
As you can see above, we’ve updated the code in the test/step-definitions/visual-regression.js file, to check if the CLI arguments of the current test run include visual-regression-reference, if this argument is included, a new reference screenshot (which replaces the current one) is created.
{
  "scripts": {
    "test:visual-regression-reference": "nightwatch -c test/conf.nightwatch.js --tags visual-regression-reference"
  }
}
The new test:visual-regression-reference npm script which we’ve added to our package.json file, can be used as a shortcut to trigger a Nightwatch.js run with the tag visual-regression-reference.
# The reference tag must be removed after
# creating a new reference screenshot!
@visual-regression @visual-regression-reference
Scenario: The homepage looks as expected

  Given I view the page on a small screen device
  When I open "http://localhost:8080"
  And I look at the homepage
  Then I expect the homepage to look the same as before
By temporarily (!) adding the @visual-regression-reference tag to certain scenarios, we can trigger the creation of new reference screenshots by running npm run test:visual-regression-reference in the command line.
Wrapping it up
Although BDD purists might not be amused by the idea of writing visual regression tests using Gherkin syntax, I think the benefit of not having to learn another tool and having all the frontend tests in one place, outweighs the drawback of not doing it exactly by the book.
If you want to run your own visual regression tests without having to set up a Nightwatch.js testing environment all by yourself, you can find all the code you’ve seen in this article on GitHub.