Styling HTML Tables: How to Apply Margin, Border and z-index on Table Elements
A long time ago, there was practically no way around the HTML <table> element for creating complex layouts on the web. Fortunately, those days are long gone. Nowadays, we only use the <table> element as it should be used: to display tabular data. However, only recently, I was reminded again that styling tables is not as easy as one might think.
Unfortunately, some CSS properties (e.g. margin, border-radius, and z-index) do not work on certain HTML table elements like <tbody>, <thead>, and <tr>. In this article, we explore how we can work around these limitations.
The final result
Table of Contents
The table markup
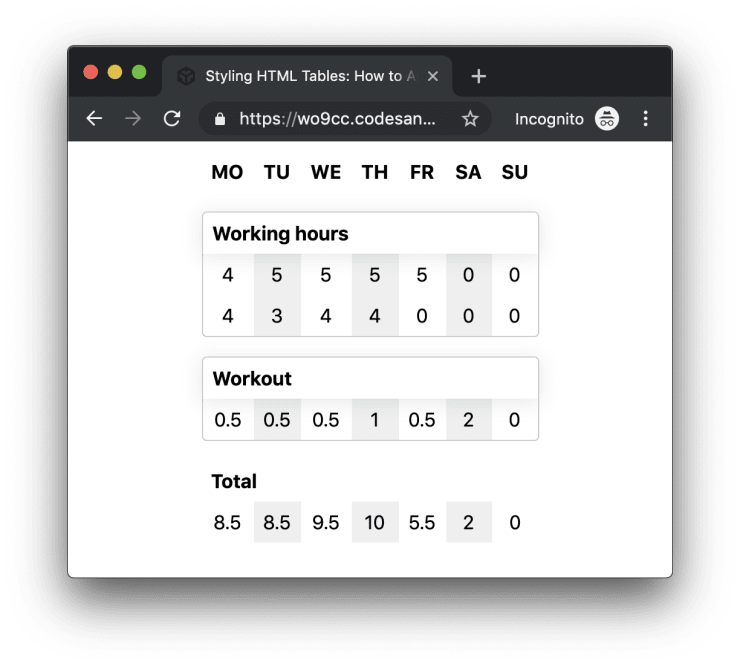
The screenshot above illustrates the final result we want to achieve: a table with the first row being the main header and multiple sections, which all have their subheaders.
<table class="table">
  <thead>
    <tr>
      <th>MO</th>
      <th>TU</th>
      <th>WE</th>
      <th>TH</th>
      <th>FR</th>
      <th>SA</th>
      <th>SU</th>
    </tr>
  </thead>
  <tbody class="section section-step">
    <tr class="sub-header">
      <th colspan="7">Working hours</th>
    </tr>
    <tr>
      <td>4</td>
      <td>5</td>
      <td>5</td>
      <td>5</td>
      <td>5</td>
      <td>0</td>
      <td>0</td>
    </tr>
  </tbody>
  <tbody class="section section-step">
    <tr class="sub-header">
      <th colspan="7">Workout</th>
    </tr>
    <tr>
      <td>0.5</td>
      <td>0.5</td>
      <td>0.5</td>
      <td>1</td>
      <td>0.5</td>
      <td>2</td>
      <td>0</td>
    </tr>
  </tbody>
  <tbody class="section">
    <tr class="section-header">
      <th colspan="7">Total</th>
    </tr>
    <tr>
      <td>8.5</td>
      <td>8.5</td>
      <td>9.5</td>
      <td>10</td>
      <td>5.5</td>
      <td>2</td>
      <td>0</td>
    </tr>
  </tbody>
</table>
Above you see the HTML structure of the table. Inside the <thead> element we have our main header and beneath it several <tbody> elements that represent separate sections of our table, each of which has its own sub header.
Using margin on table elements
As you can see in the screenshot at the beginning of this article, there is some space between the main header and the first <tbody> section and also between the individual <tbody> sections. Naive as I am, I first tried to apply margin-top to the <tbody> elements.
But unfortunately, if you try to apply margin on <tbody>, <thead> or <tr>, you will find that it has no effect. First things first: there is no magic way of making margin work on these elements other than by changing the display property (which you usually don’t want to change because you lose all table-related formatting). But there are a couple of alternative ways of how we can add some space around those elements.

Using border
The simplest solution to achieve a similar result as using margin is to add border-top: 1em onto the <tbody> elements.
// 1. Needed for making border-top spacing work.
.table {
  border-collapse: collapse; // 1
  border-spacing: 0;
}

.section {
  border-top: 1em solid transparent;
}
All our <tbody> elements, which need some space around them, have a class .section. For the border-top to work, we have to put border-collapse: collapse on our table.
Using ::before and ::after pseudo elements
Another way of applying some margin on a <tbody> element is to use a ::before or ::after pseudo element.
.section::before {
  height: 1em;
  display: table-row;
  content: "";
}
This way we basically add a new (empty) row which we can use to add some space at the beginning of our <tbody> elements.
Depending on the circumstances you might want to reach for either the border method or the pseudo element trick.
Using border-radius on table elements
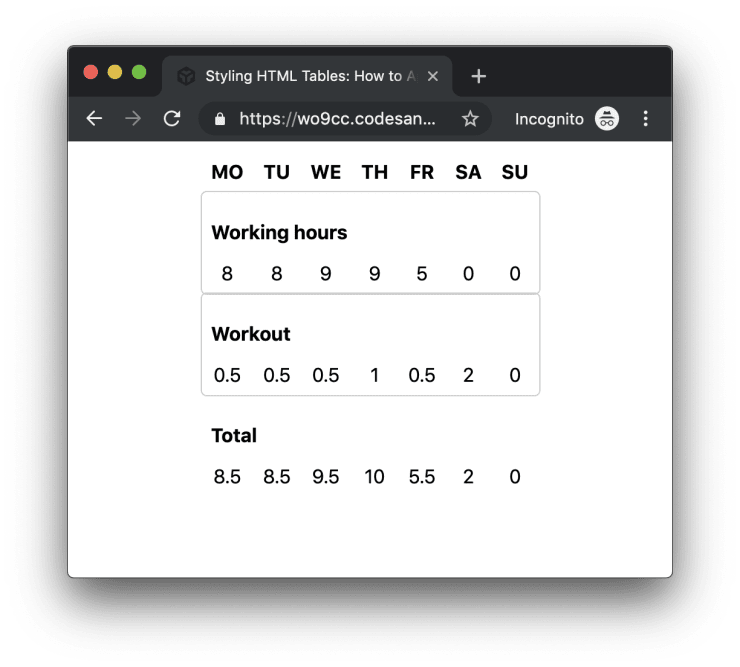
Next, we want to give our <tbody> elements a border and apply a border radius. Again we’re out of luck if we try to apply border and border-radius onto the <tbody> element itself.
// 1. Using box-shadow because otherwise
//    border-radius doesn't work on <tbody>.
.section-step {
  border-radius: 0.25em; // 1
  box-shadow: 0 0 0 1px #ccc; // 1
}
Above you can see how we can use box-shadow instead of border in order to achieve (almost) the same result.
Styling table cells instead
As you may have noticed, our current implementation doesn’t look exactly like the screenshot you saw at the beginning of this article.
The spacing hack works like padding instead of margin
Now that we’ve added the borders, we can see that our spacing hacks do not work like margin but rather like padding. Unfortunately, under these circumstances, if you have a border around a <tbody> element that must have some space to the previous element, there is no easy solution to achieve this. The only way to solve this is to apply our border styles to the table cells and use some :first-child / :last-child selector magic to achieve the desired layout.
.section-step th,
.section-step td {
  border: 0 solid #ccc;
}

.section-step th:first-child,
.section-step td:first-child {
  border-left-width: 1px;
}

.section-step th:last-child,
.section-step td:last-child {
  border-right-width: 1px;
}

.section-step tr:first-child th,
.section-step tr:first-child td {
  border-top-width: 1px;
}

.section-step tr:first-child th:first-child,
.section-step tr:first-child td:first-child {
  border-top-left-radius: 0.25em;
}

.section-step tr:first-child th:last-child,
.section-step tr:first-child td:last-child {
  border-top-right-radius: 0.25em;
}

.section-step tr:last-child th,
.section-step tr:last-child td {
  border-bottom-width: 1px;
}

.section-step tr:last-child th:first-child,
.section-step tr:last-child td:first-child {
  border-bottom-left-radius: 0.25em;
}

.section-step tr:last-child th:last-child,
.section-step tr:last-child td:last-child {
  border-bottom-right-radius: 0.25em;
}
In the code snippet above we apply the necessary border styles to the relevant th and td table cell elements. The elements at the corners must have a border radius all element on the edges must have a border. By using :first-child and :last-child selectors we can apply the styles to the correct cells.
Using z-index on table elements
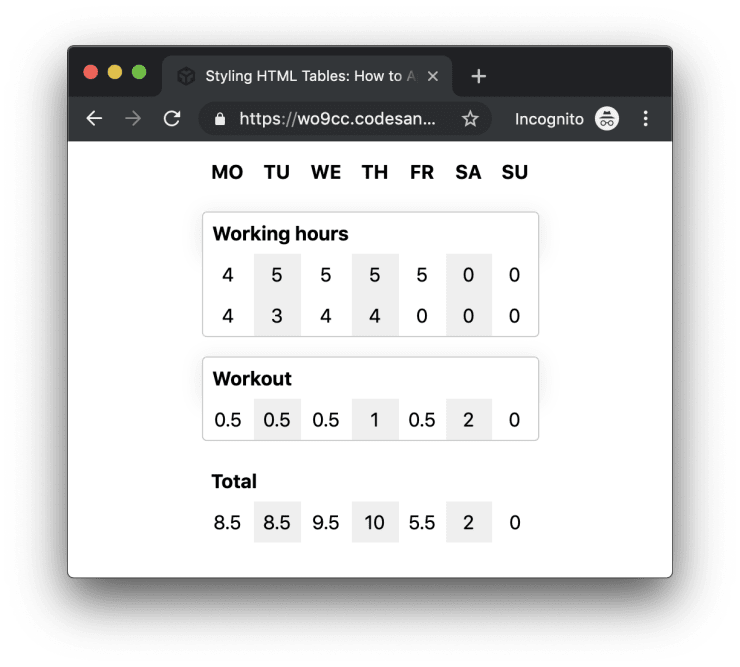
As you can see in the initial screenshot of the final result, a box-shadow has been applied to the sub header, overlaying the following row. If we try to simply apply a box-shadow to the element, we will see that the shadow of the sub header disappears behind the following row.
The box shadow disappears behind the following row
Normally, we would use z-index to raise the sub header above the following row. But as you may have guessed, using relative positioning and z-index on a <tbody> element doesn’t work either. But we can use our knowledge about the CSS stacking context to solve this problem. Applying position: relative and a z-index to an element creates a new stacking context. But this is not the only way we can achieve this: for example, we can also use transform: translate(0, 0).
The final result
Wrapping it up
We have to dig deep into the CSS bag of tricks to make some more complicated table layouts work. But the beauty of CSS is that there is always a way to achieve certain things.
We could have made our lives a little easier by overriding the display property of our table elements. But that means you have to explicitly specify the width of each cell to make the columns equally wide. This may be okay in certain cases, but it’s often more convenient to rely on the browser to automatically determine the width of each cell.