Payment Request API Part 1: Payment Process Using the Credit Card Payment Method
This is the first part of a three-part series on how to use the new Payment Request browser API. In this article we’re implementing a very basic payment process, collecting credit card data via the Payment Request API. In the second article we’re going to look at how to build a Payment Request API powered shopping cart. Last but not least in the third article of this series, we’ll implement taxes and discounts into our payment process.
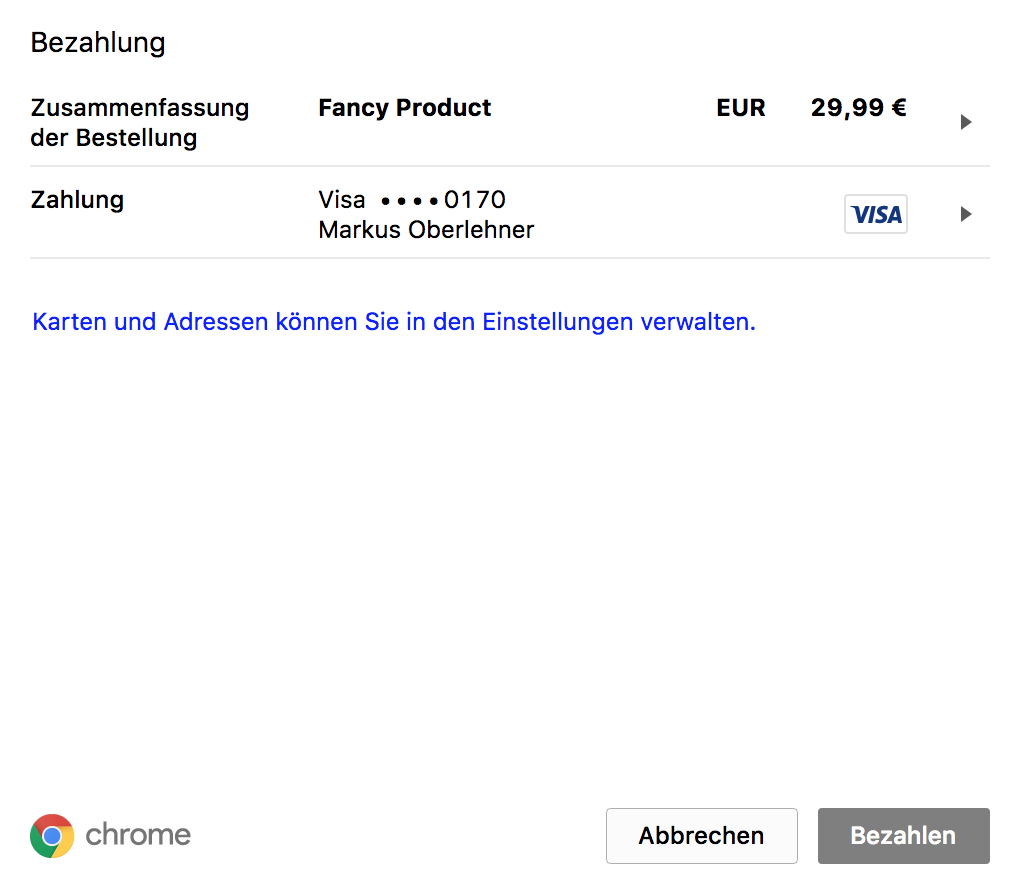
Payment Request API popup (Chrome 61)
Thanks to the Payment Request API, accepting payments from our users now is a piece of cake. Albeit support from third party payment processors is still rather limited – Android Pay being one of the most notable – this will very likely change in the near future. Furthermore you don’t necessarily need a third party payment provider to integrate directly into the Request Payment API, it is also possible to collect credit card data from the user via the Request Payment API and send them to your payment provider using it’s own API.
Building a demo shop using the Request Payment API
In the following examples we’ll examine how to collect credit card data from a user in order to pay for a product in an online shop. The end result will be a little demo shop – you can look at the complete code of the demo shop on GitHub.
Basic HTML structure and event listeners
We’ll keep the basic structure of our demo shop very, very simple. The only thing we want to show is a (fake) product that the user can buy. Buying the product triggers the Request Payment API (if the browser supports it).
<div
  class="product"
  data-id="PRODUCT-001"
  data-label="Fancy Product"
  data-currency="EUR"
  data-value="29.99"
>
  <h2>Fancy Product</h2>
  <p>I'm a super awesome product, please buy me!</p>
  <div class="product__cta">
    <strong class="product__price">only 29.99 €</strong>
    <a href="#no-js-checkout" class="product__button">Buy</a>
  </div>
</div>
What you can see above is a very basic HTML structure for a product card. We’ve added data attributes for all the product details which we later going to need for starting a new payment request.
const $products = document.querySelectorAll(".product");
[].slice
  .call($products)
  .forEach(($product) =>
    $product.addEventListener("click", handleProductClick),
  );
In this step we’re adding event listeners for the click event to all products which might be on the page. If a user clicks on a product, the handleProductClick() function is called.
function handleProductClick(e) {
  e.preventDefault();

  const $product = e.currentTarget;
  const $button = e.target;

  if ($button.classList.contains("product__button")) {
    const product = productFromDom($product);
    const paymentDetails = paymentDetailsFromProduct(product);

    payment(paymentDetails)
      .then((paymentResponse) => paymentHandler(paymentResponse))
      .catch((error) => errorHandler(error));
  }
}
The handleProductClick() function checks if the click target actually was the button inside the product and if so, retrieves the product data via the productFromDom() function. Next we’re creating a new paymentDetails object by calling paymentDetailsFromProduct(). We’re going to use the paymentDetails object to build the payment request. At last we’re calling the payment() function with paymentDetails as its parameter, to trigger a new payment request.
If everything worked correctly, the then() method is called which in turn is calling the paymentHandler() function.
If the payment gets cancelled or some other error occurs, we catch the error and pass it to our errorHandler() which takes further action (in our case, just logging the error to the browser console).
Initializing functions
In order to make it easier to structure and test our codebase, we’re going to make heavy use of factory functions and dependency injection for initializing all the functions that we need without having to specify their dependencies every time we’re using them. The following block of code initializes all the functions we need via their factory functions.
// Check if the `PaymentRequest` object is available,
// if not we substitute it with a polyfill.
const PaymentRequest = window.PaymentRequest || PaymentRequestPolyfill;
// In a real world application the payment processor
// would be a payment provider like PayPal or Stripe.
const paymentProcessor = paymentProcessorFactory();
// We're using a payment handler function as a
// wrapper around the API of our payment processor.
const paymentHandler = paymentHandlerFactory({ paymentProcessor });
// The error handler deals with failed or cancelled payments.
const errorHandler = errorHandlerFactory();
// We wrap the `PaymentRequest` object with a factory
// so we have to provide the `paymentMethods` only once.
const paymentRequest = paymentRequestFactory({ paymentMethods });
// The `payment` function triggers a new payment
// request and returns a promise.
const payment = paymentFactory({ paymentRequest });
// Create a `product` object from a DOM node.
const productFromDom = productFromDomFactory();
// Build a `paymentDetails` object from a `product` object.
const paymentDetailsFromProduct = paymentDetailsFromProductFactory();
Submiting a payment request
Because their specific implementation doesn’t matter too much for our example, I won’t go into much detail about how PaymentRequestPolyfill, paymentProcessorFactory(), errorHandlerFactory(), and productFromDomFactory() are implemented. If you’re interested in the code you can look at the complete code on GitHub.
The payment details object
function paymentDetailsFromProductFactory() {
  return (product) => ({
    total: {
      label: product.label,
      amount: {
        currency: product.currency,
        value: product.value,
      },
    },
  });
}
The PaymentRequest function expects a paymentDetails object as its second parameter. The function returned by the paymentDetailsFromProductFactory() function you can see above, takes a product object and returns a new paymentDetails object to be used for triggering a payment request.
Wrapping the PaymentRequest object
function paymentRequestFactory({ paymentMethods }) {
  return (paymentDetails) => new PaymentRequest(paymentMethods, paymentDetails);
}
The paymentRequestFactory() function you can see above, is basically a wrapper around the PaymentRequest object. There are two reasons why we’re wrapping it in our own factory function: first of all to make our codebase more modular and easily testable and secondly because, although we might have different products (resulting in different paymentDetails) on our website, the paymentMethods most likely stay the same, no matter which product the user wants to buy. By using a factory function we can initialize a new instance of the PaymentRequest object with the paymentMethods already preconfigured.
const creditCardPaymentMethod = {
  supportedMethods: ["basic-card"],
};
const paymentMethods = [creditCardPaymentMethod];
The paymentMethods you can see above, are passed to the paymentRequestFactory() function to initialize a new PaymentRequest using those payment methods. In our example we’re only defining basic-card as a payment method, you can read more at developers.google.com about other available payment methods.
Triggering a payment request
The payment() function is where the magic happens. We call this function every time the user should be promted to enter his or her payment details.
function paymentFactory({ paymentRequest }) {
  return (paymentDetails) => paymentRequest(paymentDetails).show();
}
Again we’re using a factory function for better testability and easier consecutive usage. The payment() function is calling the PaymentRequest instance provided by the paymentRequest() function which is injected as a dependency.
By calling the show() method on the paymentRequest() function we’re telling the browser to show the payment popup and ask for the credit card information of the user.
function paymentHandlerFactory({ paymentProcessor }) {
  return (paymentResponse) => {
    // This is the place to submit the payment data
    // to your payment processor (e.g. PayPal or Stripe).
    paymentProcessor
      .send(paymentResponse)
      .then(() => paymentResponse.complete());
  };
}
The paymentHandler() function is responsible for handling the payment data which the user provided. Usually this means sending them to a third party payment provider like PayPal or Stripe. The most important thing which is going on here is calling the complete() method on the paymentResponse object – this is telling the browser, that everything worked correctly which in turn closes the payment popup.
Full code and demo
The code snippets in this article only illustrate the most important parts of the code. If you want to see the full code, please take a look at the code at the GitHub repository.
The code you can see on GitHub is the code used to build this demo page on which you can see the Payment Request API in action.