How To Fix Spacing Between Text Blocks When Using Tailwind CSS
Did you ever encounter the problem that the space between a text block and some other element seems wrong? For example, although we’ve added the same mt-4 to a text block and some images, the space between text and image looks much larger than the space between two images. So instead of mt-4 we try mt-3, but it just doesn’t work out. This happens because the same margin can look visually different if it separates text from some element instead of separating two non-text elements. After all, the line height of the text block adds additional spacing.
The problem in depth
Line height adding additional spacing is a known issue with CSS. When we apply a margin-top of 1em, we expect two elements to be separated by exactly 1em. And for elements with a solid background, a border, or for images, this is true. But not so for text blocks.
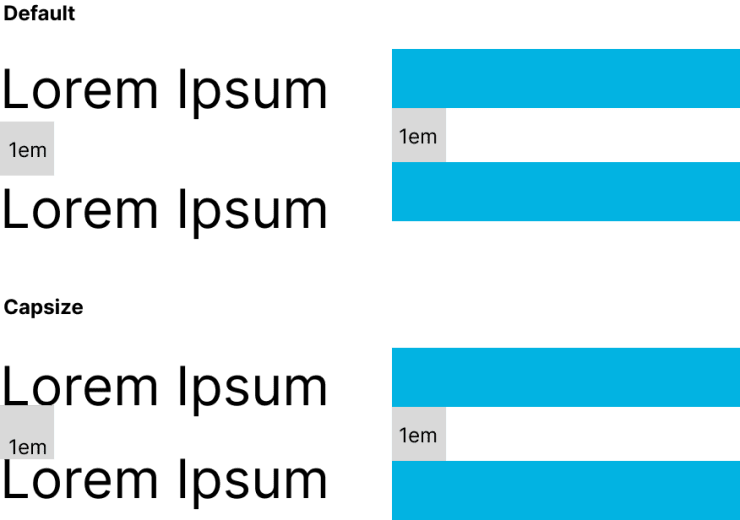
Because text blocks have a visual height that does not match their effective height (line height), if we apply margin-top: 1em to a text block, the spacing is 1em + whatever the line height adds to it (which can be a lot, especially at large font sizes and line heights). Yet the visual size of a text block approximately equals the imaginary line at the top and bottom of uppercase letters.
Capsize to the rescue
Luckily, there is a technique we can use to deal with this problem: Capsize. Although we could use Capsize as is with Tailwind CSS, too, using a dedicated Tailwind plugin can make our lives easier.
And again, we’re lucky: there is a Tailwind plugin ready for us to use too: https://www.npmjs.com/package/tailwindcss-capsize
// tailwind.config.cjs
module.exports = {
  // ...
  plugins: [
    require("tailwindcss-capsize")({
      className: "leading-trim",
    }),
  ],
};
I like to change the class name to leading-trim, but this is a matter of personal taste!
@tailwind base;
@tailwind components;
@tailwind utilities;

@layer components {
  .leading-trim {
    @apply align-middle font-sans text-base;
  }
}
By default, the plugin requires you to specify the font-family and font-size on every element you want to apply the leading-trim style to (e.g., <p class="leading-trim font-sans text-base">). I’m a fan of sensible defaults, so I extend the leading-trim class in my base styles so that it sets the most common styles by default. If I want to, I can override them: <p class="leading-trim text-lg">.
Using the leading-trim utility class
We’ve set up everything to add the leading-trim utility class to whatever text block we want. And I recommend adding it to every text block! That way, adding consistent spacing between (text) elements becomes much more intuitive.
<h1 class="leading-trim text-lg">
  Headline
  <h1 />
  <p class="leading-trim">Paragraph</p>
</h1>
Wrapping it up
Hopefully, one day we’ll have native support in CSS for leading-trim. But until the day arrives, using Capsize and the Capsize Tailwind plugin is a viable workaround.