Distributed Vue.js Applications Part 2: Pushing Content and Component Updates to the Client
In the first part of this series, we’ve seen how we can build standalone Vue.js components and how we can load them via HTTP to make it possible to share them via a central distribution server. In this article, we explore how we can leverage the power of WebSockets to push content and even component updates to lean Vue.js client applications.
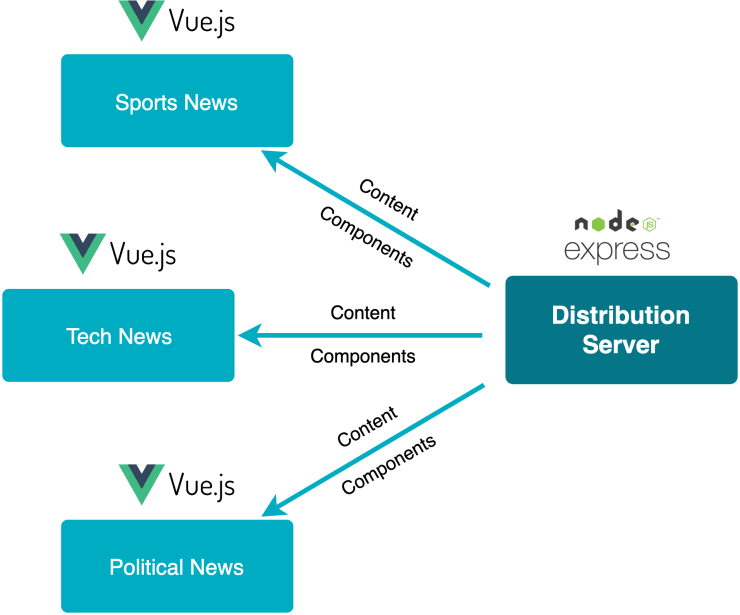
The final result is a simple news feed application that demonstrates the basic principles of this approach. We want to fetch the latest news from a REST API endpoint and subscribe to a WebSocket feed to check for updates on existing or new news items.
You can find a live demo of the application on Netlify, and you can check out the code on GitHub. Please note that the live demo does not make use of WebSockets but rather fakes them to make the deployment easier.
Building a simple API endpoint
For the first step we need a simple API endpoint which returns a list of news articles. We can build upon the very simple static server we’ve already set up in the first article.
// server/index.js
const express = require("express");
const path = require("path");

const news = require("./data/news.json");

// ...

app.get("/news", (req, res) => {
  res.send(news);
});

// ...
As you can see above, we load a JSON file with news items. In a real world application, you’d most likely fetch data from a database or another API.
Creating a WebSocket server
Now that we’ve set up our basic /news endpoint for sending the initial data, let’s proceed with implementing a Node.js powered WebSocket server.
npm install wsconst express = require("express");
const path = require("path");
const webSocket = require("ws");
const http = require("http");
const news = require("./data/news.json");
const news1Update = require("./data/news-1-update.json");
const news3add = require("./data/news-3-add.json");
const PORT = 8200;
const app = express();
// Allow cross origin requests.
app.use((req, res, next) => {
res.header("Access-Control-Allow-Origin", "*");
res.header(
"Access-Control-Allow-Headers",
"Origin, X-Requested-With, Content-Type, Accept",
);
next();
});
// ...
const server = http.createServer(app);
const wss = new webSocket.Server({
path: "/ws",
server,
});
const ADD = JSON.stringify({
type: "ADD",
entity: news3add,
});
const UPDATE = JSON.stringify({
type: "UPDATE",
entity: news1Update,
});
wss.on("connection", (ws) => {
setInterval(() => ws.send(ADD), 5000);
setTimeout(() => setInterval(() => ws.send(UPDATE), 5000), 2500);
});
server.listen(PORT);
console.log(`Listening on: http://localhost:${PORT}`);In the code snippet above you can see that we push a new article every 5 seconds. Additionally we update one of the existing articles also every 5 seconds but with a delay of 2.5 seconds. This is for demonstration purposes only, in a real world application you’d push new or update existing content whenever there is new or updated content. Next up we need to connect our Vue.js client application with our newly created endpoints.
If you’re interested in the structure of the data files you can take a closer look on GitHub.
Connecting Vue.js components with WebSockets
Next we build a renderless component which makes it possible to conveniently pair Vue.js components with a WebSocket connection and a REST endpoint.
import axios from "axios";

import ws from "../utils/ws";

export default {
  name: "FrameLiveFeed",
  props: {
    endpoint: {
      required: true,
      type: String,
    },
  },
  data() {
    return {
      entities: [],
    };
  },
  created() {
    // Fetch initial data.
    this.fetch();

    // Listen for new data.
    ws.onmessage = ({ data }) => {
      const message = JSON.parse(data);
      this[message.type.toLowerCase()](message.entity);
    };
  },
  methods: {
    add(entity) {
      if (this.entities.find((x) => x.data.id === entity.data.id)) return;
      this.entities = [entity, ...this.entities];
    },
    update(entity) {
      this.entities = this.entities.map((x) => {
        if (x.data.id === entity.data.id) return entity;
        return x;
      });
    },
    async fetch() {
      const { data } = await axios.get(this.endpoint);
      this.entities = data;
    },
  },
  render() {
    return this.$scopedSlots.default({
      entities: this.entities,
    });
  },
};
In this snippet you can see the code of our newly created FrameLiveFeed renderless component which is highly reusable for providing lists of data (entities) of any kind. We initially query the endpoint which must be provided via a property and then also listen for updates on the WebSocket connection.
Next, you can see a basic example of how this component can be used.
<template>
  <FrameLiveFeed v-slot="{ entities }" endpoint="http://localhost:8200/news">
    <ul>
      <li v-for="entity in entities" :key="entity.data.id">
        <h2>{{ entity.data.headline }}</h2>
      </li>
    </ul>
  </FrameLiveFeed>
</template>
Dynamically render components
Now we need a way to dynamically render the components which are associated with a certain news article. Our application does not know about those components beforehand so we have to dynamically import those components. Furthermore those components can be updated on the fly so we have to watch out for a new version and re-render if the underlying component of a news item has been updated.
<template>
  <Component :is="computedComponent" v-bind="props" />
</template>

<script>
import externalComponent from "./utils/external-component";

export default {
  name: "DynamicComponent",
  props: {
    component: {
      required: true,
      type: Object,
    },
    props: {
      default: () => ({}),
      type: Object,
    },
  },
  data() {
    return {
      computedComponent: null,
    };
  },
  watch: {
    component: {
      immediate: true,
      handler(newComponent, prevComponent = "") {
        if (newComponent.url === prevComponent.url) return;

        this.computedComponent = () => externalComponent(this.component.url);
      },
    },
  },
};
</script>
Here you can see the code of the DynamicComponent component. We take a component and a props object as properties. In order to automatically load a new version of the component whenever the component property updates, we use a watcher on the respective property.
The props property is bound to the dynamic component <Component> using v-bind which passes all the properties of the given object as separate properties to the component.
Do you want to learn more about advanced Vue.js techniques?
Register for the Newsletter of my upcoming book: Advanced Vue.js Application Architecture.
Building a news feed component
Now let’s combine everything we’ve built so far to create a simple news feed component.
<template>
  <FrameLiveFeed
    v-slot="{ entities: news }"
    endpoint="http://localhost:8200/news"
  >
    <ul>
      <li v-for="newsEntity in news" :key="newsEntity.data.id">
        <DynamicComponent
          :component="newsEntity.component"
          :props="newsEntity.data"
        />
      </li>
    </ul>
  </FrameLiveFeed>
</template>

<script>
import DynamicComponent from "./DynamicComponent.vue";
import FrameLiveFeed from "./frames/FrameLiveFeed.vue";

export default {
  name: "NewsFeed",
  components: {
    DynamicComponent,
    FrameLiveFeed,
  },
};
</script>
In the following video you can see the automatically updating news feed component in action. Note that not only the content is dynamically updated but also the underlying component of the last news item.
First a new item is added, then the last item is updated
Wrapping it up
Using this approach makes it possible to build very simple Vue.js consumer applications which don’t have to know an awful lot about all of the components which might be used to render certain content types. A central distribution server can push new components to its clients at any point in time. This opens a whole lot of exciting opportunities for building large scale applications and systems.
But keep in mind: this example is a very naive implementation of the concept. It is simply not possible to build a business grade application over the course of one (or event two) blog articles. There might be some aspects of the concept which you have to tweak for the scale of your application.