Building a Static Site with Storyblok and Gridsome
Gridsome is a relatively new static site generator based on Vue.js. It’s similar to Gatsby.js but powered by Vue instead of React. In today’s article we’ll take a closer look at Gridsome and how it compares to the well established Nuxt.js framework.
We will integrate the headless CMS Storyblok as a datasource for Gridsome an we’ll build a simple site to demonstrate the capabilities of those systems.
For this article, I’ll assume that you have some basic knowledge about how to build websites with Storyblok. If you’re completely new to Storyblok, you can read my previous article about building sites with Storyblok and Nuxt.js where I take a deeper look at how to build pages with Storyblok.
You can see a demo of the site hosted on Netlify and you can lookup the complete code on GitHub.
Differences between Gridsome and Nuxt.js
Gridsome, as well as the generate mode of Nuxt.js, both generate pre-rendered static HTML from a regular Vue.js application. So much for the similarities, let’s take a look at some of the differences between Gridsome and Nuxt.js.
Gridsome is a tool for building static websites. It’s best suited for brochure sites and blogs. Because Nuxt.js has a dedicated server rendering mode, it’s able to do a lot more. It not only pre-renders the static HTML of a Vue.js application, but it is also able to run server-side logic like handling authentication via middleware.
If you’re planning to build a large scale application, handling authentication and other stuff which is better suited to be handled on the server-side, Nuxt.js is definitely the way to go. But if, what you’re building is more simple than that, the very fast build and render times of Gridsome are a pretty good reason to choose it over Nuxt.js.
Setting up Gridsome
Fortunately, setting up Gridsome is straightforward. You can follow the official documentation to set up a fresh Gridsome project.
Integrating Storyblok into Gridsome
Gridsome is using datasources, which are wrapped by a GraphQL layer, to fetch the data needed to render your website. What this means is, that, if we can’t use one of the official datasource plugins, we have to write our own.
Writing a custom Storyblok datasource plugin
We can use the storyblok-js-client package to query the Storyblok API.
npm install storyblok-js-clientNow we’re able to create a new Gridsome datasource plugin for Storyblok.
// src/plugins/source-storyblok/index.js
const StoryblokClient = require("storyblok-js-client");

class StoryblokSource {
  static defaultOptions() {
    return {
      typeName: "StoryblokSource",
      accessToken: undefined,
    };
  }

  constructor(api, options) {
    this.options = options;
    api.loadSource((args) => this.fetchContent(args));
  }

  async fetchContent(store) {
    const { addContentType } = store;
    const { accessToken } = this.options;

    const client = new StoryblokClient({ accessToken });
    const response = await client.get("cdn/stories", {
      // Only load stories of type `landing_page`.
      filter_query: {
        component: {
          in: "landing_page",
        },
      },
    });

    // Create a new Gridsome content type
    // for `landing_page` stories.
    const landingPages = addContentType({
      typeName: "LandingPage",
    });

    // Create new entries for every story.
    response.data.stories.forEach((story) => {
      landingPages.addNode({
        fields: {
          intro: story.content.intro,
          mediaBlocks: story.content.media_blocks,
          teasers: story.content.teasers,
        },
        path: story.slug,
        title: story.content.title,
      });
    });
  }
}

module.exports = StoryblokSource;
The code above demonstrates a very basic implementation. It only creates one content type. Depending on your needs, you might update the implementation to create multiple content types for different story components.
Next up we have to update our gridsome.config.js file to let Gridsome know about our new datasource plugin.
// gridsome.config.js
const path = require("path");

module.exports = {
  siteName: "Building a Static Site with Storyblok and Gridsome",
  plugins: [
    {
      use: path.resolve("./src/plugins/source-storyblok"),
      options: {
        // This is your Storyblok access token.
        // You can find it on the settings page
        // of your storyblok space.
        accessToken: "1EXLzwtmMQriQRnJ4zRQ7Qtt",
      },
    },
  ],
};
Querying data with GraphQL
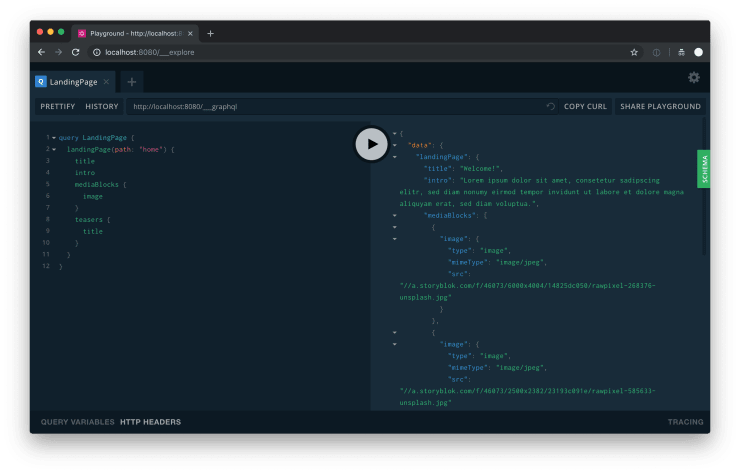
Now that we’ve successfully set up our new Storyblok data source, we’re able to start the Gridsome development server and check out if everything works as expected.
npm run developYou can use the integrated GraphQL explorer http://localhost:8080/___explore to test your GraphQL queries. You can view your website by opening http://localhost:8080 in the browser.
Building a landing page Vue.js component
Everything is set up – let’s build a landing page component to render the data provided by the Storyblok API.
<template>
  <Layout>
    <div class="Home">
      <div class="Home__hero mb-md-5 mx-auto mb-4 text-center">
        <h1 class="display-4">{{ $page.landingPage.title }}</h1>
        <p class="lead">{{ $page.landingPage.intro }}</p>
      </div>

      <div class="Home__media-blocks mb-5">
        <AppMediaBlock
          v-for="mediaBlock in $page.landingPage.mediaBlocks"
          :key="mediaBlock._uid"
          v-bind="mediaBlock"
        />
      </div>

      <ul class="Home__teasers mb-5">
        <li v-for="teaser in $page.landingPage.teasers" :key="teaser._uid">
          <AppTeaser v-bind="teaser" />
        </li>
      </ul>
    </div>
  </Layout>
</template>

<page-query>
  query LandingPage { landingPage(path: "home") { title intro mediaBlocks {
  image image_position text title } teasers { image link { url } text title } }
  }
</page-query>

<script>
import AppMediaBlock from "../components/AppMediaBlock.vue";
import AppTeaser from "../components/AppTeaser.vue";

export default {
  components: {
    AppMediaBlock,
    AppTeaser,
  },
};
</script>
In the <page-query> block you can see the GraphQL query which is used to fetch the data we need to render our landing page. We can access the data inside the <template> section via the $page.landingPage variable.
If you want to take a closer look at the AppMediaBlock and AppTeaser components, you can check out the code on GitHub.
Performance
I’m really impressed with the performance of websites created with Gridsome. In the following screenshot, you can see the Lighthouse results for our newly created page.
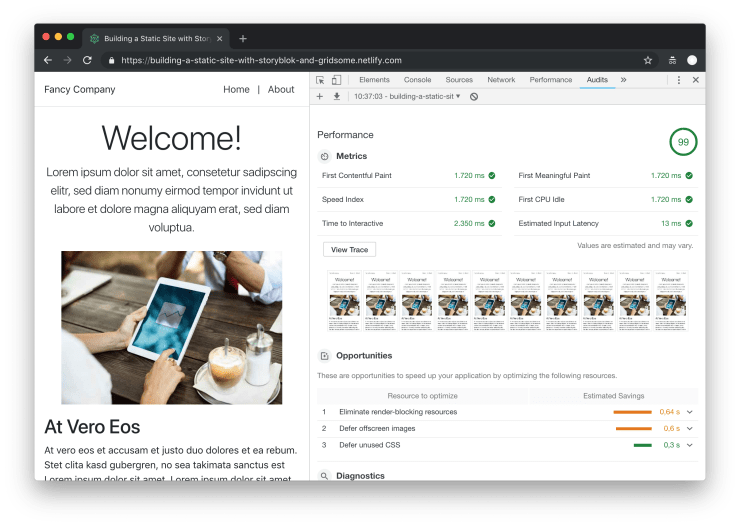
Because of laziness i used Bootstrap to style the site. I’m pretty sure that simply removing all the parts of Bootstrap that are not needed to render the website, would give us a perfect 100/100 score.
Wrapping it up
Although setting up the datasources requires some fiddling around and a lot of trial and error, the final result is pretty impressive. Especially the blazing fast performance and tiny bundle size of the resulting website makes it very tempting to choose Gridsome over Nuxt.js for simple websites.
Unfortunately though, the documentation is still lacking and from what I’ve seen checking the website every now and then since a few weeks, there seems to be not a lot of progress on this front.
If performance is your number one priority or if you’re a fan of GraphQL and you can deal with the lack of documentation, Gridsome might be a good choice for powering your next project.